The user status panel allows you to provide insight into your availability in asynchronous work environments. The overall panel includes two main features:
- Online status (Unlimited plan only): This is a custom highlight on your user profile across different spaces that represents whether you are currently online. This is represented with a green circle.
- Custom status: This will add an emoji next to your profile image across spaces to share what you’re doing or feeling. Think of ‘busy’, ‘available to chat’, or ‘on holiday’ as relevant information you might want to display on your profile.
How to access the panel
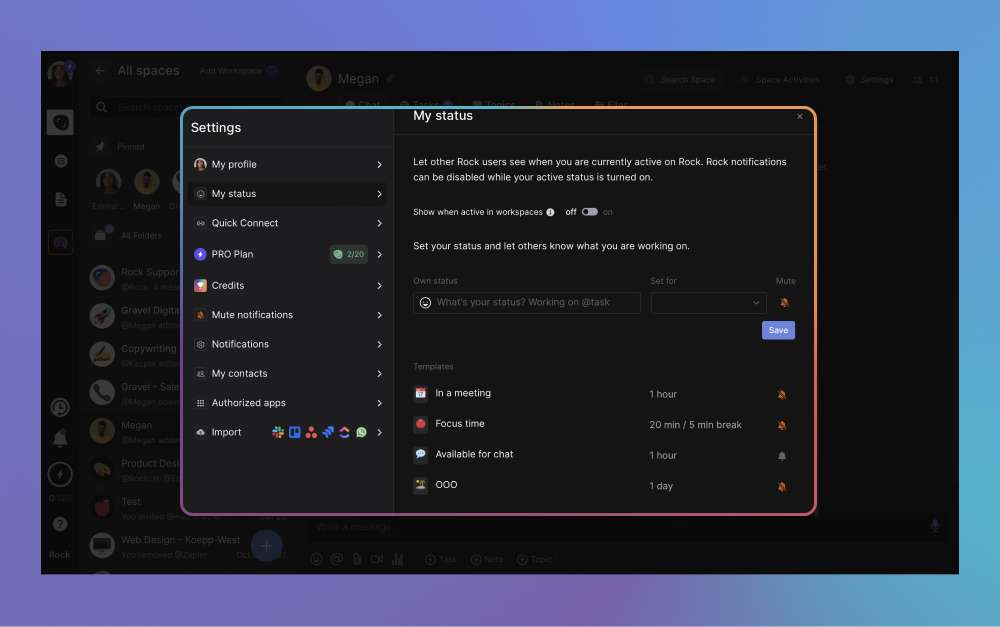
You can access the user status panel by selecting your user image in the top left corner of your screen. From there, select ‘status’ or click on ‘settings’ -> user status.This should bring you to the panel below.
[Unlimited plan] Online status
Online status functionality is currently only available for users under the Unlimited plan.
If you would like to access the feature you have to either upgrade to Unlimited or collect enough points under the credit program to test the functionality out on Unlimited starter.
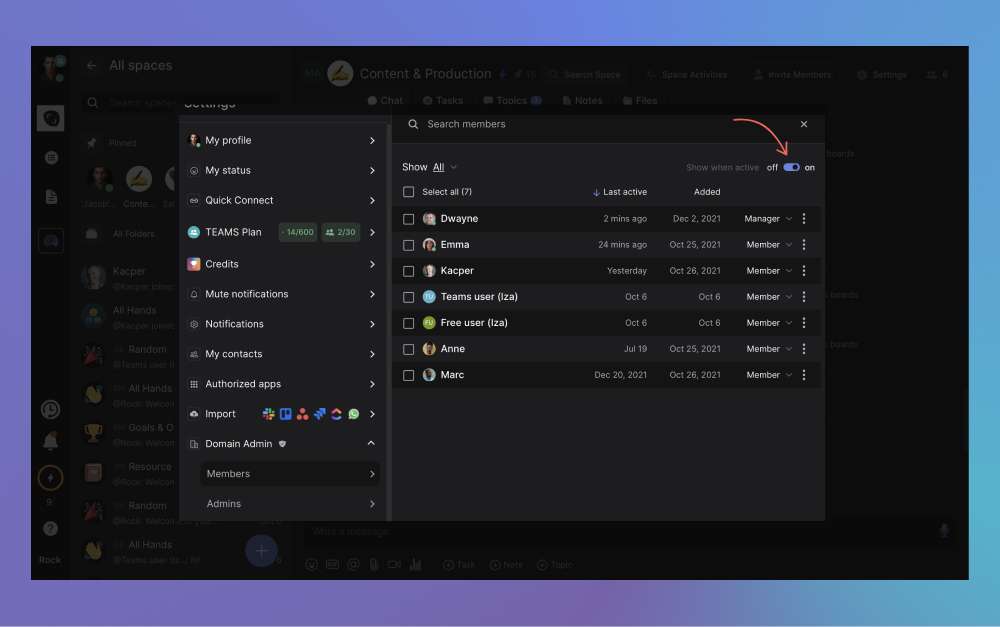
How to manage online status for your whole team
You can enable the online status of your whole team from the Unlimited panel. Access this panel by going to domain admin -> members.
You can toggle the online status “on” by clicking on the button in the top right corner of your screen.
In addition to the toggle, you can also see when users were added to your organization and when they were last active on Rock. Switching online status on or off for the whole domain is only possible if you claimed that domain.
Note that the functionality will be switched on by default for accounts that fall under the Unlimited plan.
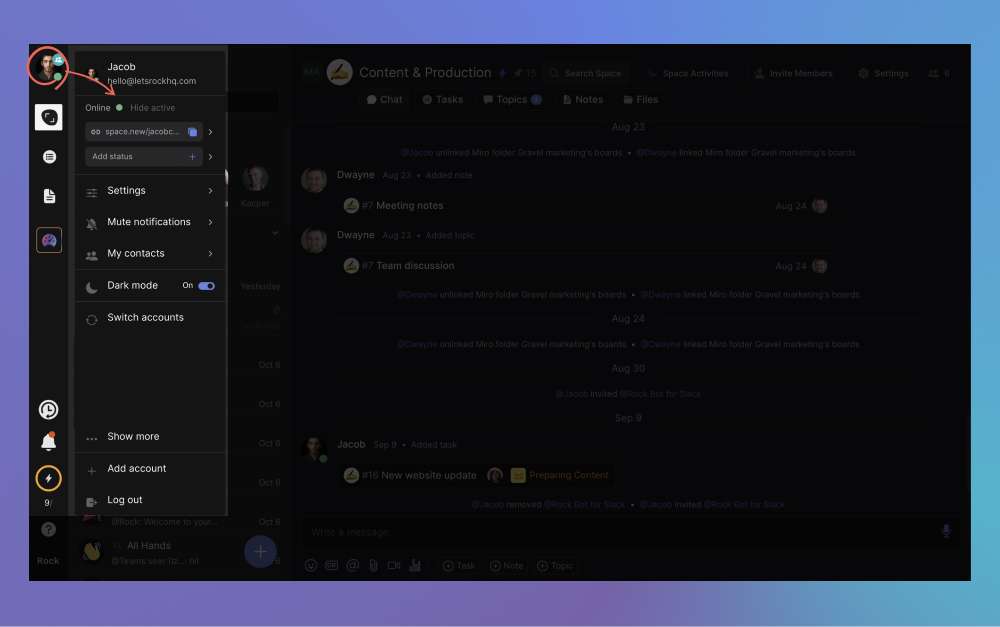
Managing your own online status
Toggle your online status by going to the quick settings panel. Click on your user image in the top left corner of your screen and toggle between ‘show online status’ and ‘hide active’.
Note that your preferences in this panel override workspace-wide settings for active status for not displaying the status. If workspace settings have this functionality turned off, then you won’t be able to turn it on for individual active status settings.
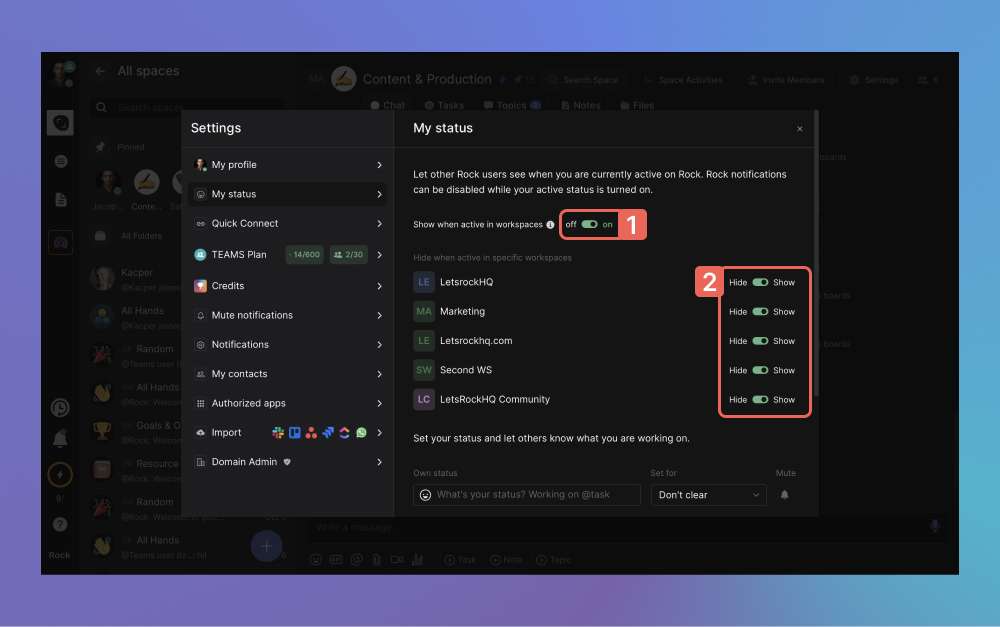
You can also manage account-wide online status or filter by workspaces from the user status panel.
- Account-wide online status: Enable active status for all spaces by pressing the toggle in the top right corner of the panel. Preferences in this panel override the online status toggle in the user management panel.
- Workspace online status: Besides managing your online status for every space, you can also select what workspaces display active status. Select the individual toggles next to each workspace to configure active status for them.
📝 Note: while within the workspaces your active status will not show, users will still be able to see it in their 1:1 spaces with you or group spaces you share outside of a workspace.
Once configured, the active status will display in the following places:
- The space image of 1:1 spaces where other users have active status turned ON.
- Messages the user has sent in 1:1 or shared spaces, next to the user’s profile picture.
- The user image if they are assigned to tasks, notes, and topics.
- Individual comments under tasks, notes, and topics will also highlight activity next to the user image.
- Your personal space while you’re online.
- Your profile details when someone clicks on your user image.

Custom status
The custom status functionality is available in all plans and allows you to add more information about your availability, mood, or other highlights next to your profile image.
How to configure the custom status
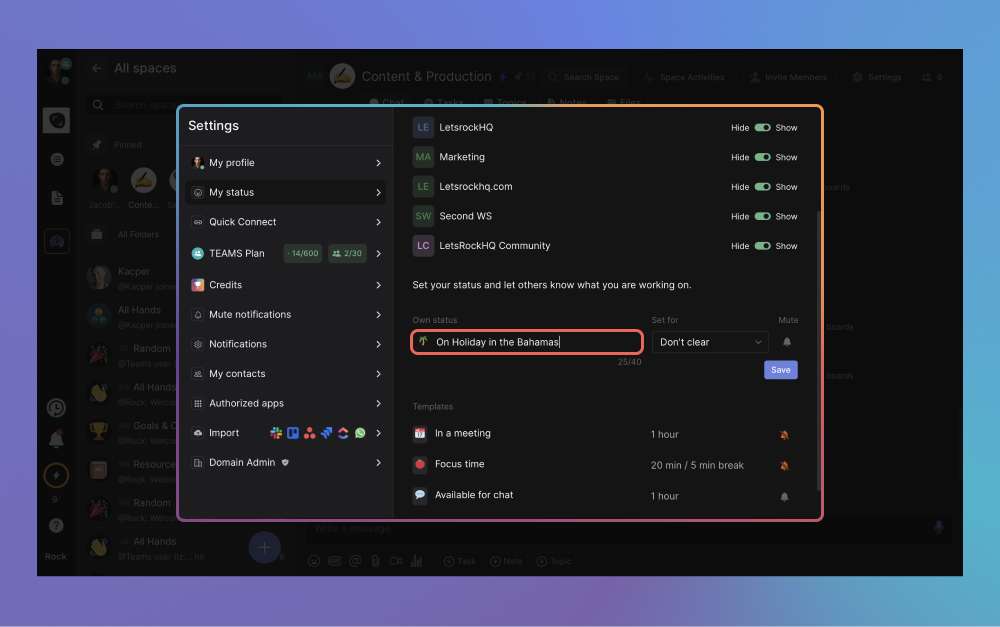
You can create a custom status by configuring the following fields:
- Emoji
- Name
- Time frame
- Mute notifications
Don’t forget to click on ‘save’ after filling out the different fields.
Pick an emoji
Configure an emoji that will appear next to your name across spaces. You can pick from hundreds of different emojis in the library. There is also a search field to more easily find the icon you’re looking for.
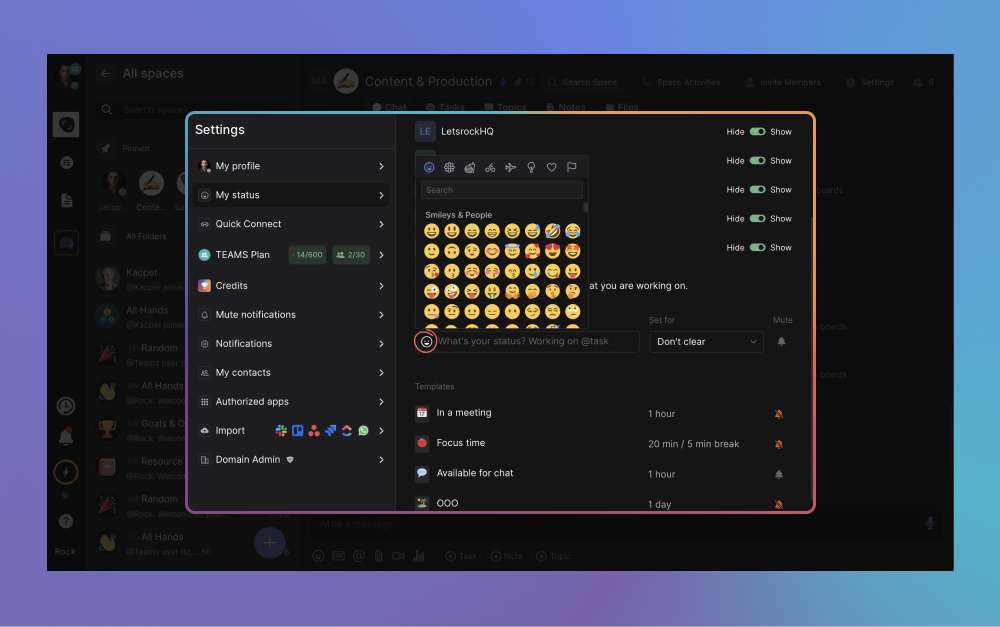
Name your status
Give your status a name, this will appear when other users hover over the emoji next to your name across spaces. This custom status name can have up to 40 characters.
Set a timeframe
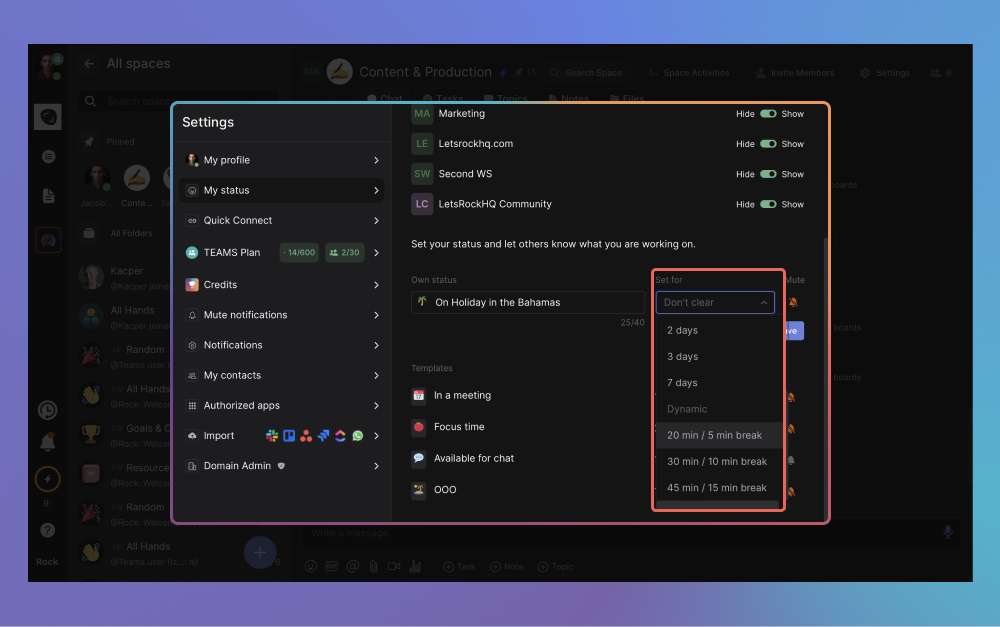
Select how long the custom status should be displayed on your profile. You can pick between fixed and dynamic time frames:
- Fixed time slots: The status and its configuration will remain until changed (don’t clear) or automatically turn off after a chosen timeslot (30 min, 1 hour, 2 hours, 1 day, 2 days, 3 days, 7 days).
- Dynamic time slots: Dynamic time slots by default run until changed (don’t clear). Notifications switch from muted to enabled within these slots. You can pick notifications to come in as:
- 20 minutes muted, 5 minutes enabled
- 30 minutes muted, 10 minutes enabled
- 45 minutes muted, 15 minutes enabled.
The emoji next to your user name will disappear after a selected timeslot is changed or if the status is removed. Muting settings will also go back to the default in your notification settings.
📝 Note: If you mute an individual space in space settings, then notifications will not be received even if you have notifications enabled for 5, 10, or 15 minutes. If you wish to enable notifications of that space you have to do it in space settings.
Mute notifications
Select the notification item to decide whether you want to receive notifications or mute them. You can enable or disable notifications by clicking on the bell.
Note that notification preferences in your user status panel will override those in the notifications panel.
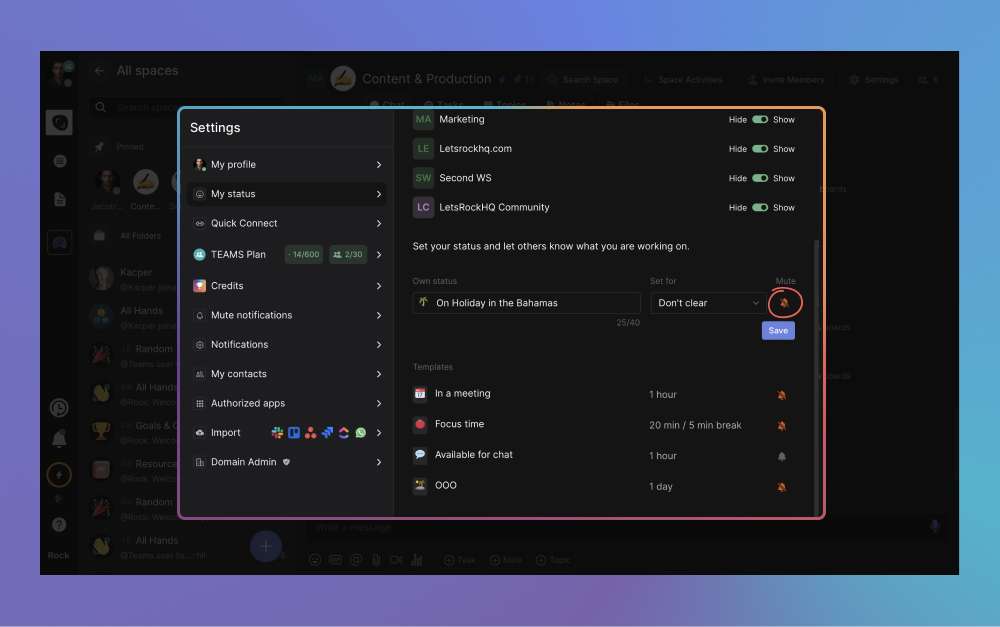
📝 Note: If you have a dynamic time slot activated, then the mute button will not change the settings of your custom status. You will receive notifications in the selected timeslot and they will be muted for the remainder of it.
Don’t forget to click on save after updating all the fields. After that, the custom status will display in the following places:
- Comments: The custom status will be displayed next to the user profile on comments under tasks, notes, and topics.
- Messages: The custom status shows next to the user images on messages in the general chat.
- Profile details: The status will also be displayed on the user profile summary people access by clicking on your image.
- 1:1 spaces: An icon will display next to the user image on 1:1 spaces in the spaces panel.
If you wish to remove the status you do so by going to the panel and selecting ‘clear status’.
Activating a Template
There are 4 templates available for custom statuses. After selecting one you can still adjust them to your preferences and work situation. To enable a template, click on it.
Once you have selected a template you can still modify all its elements with the steps provided in the previous section. The current panel includes 4 templates associated with common availability indicators:
- In a meeting
- Focus time
- Available for chat
- OOO
In a meeting
Turning notifications off during meetings allows you to focus on the discussions at hand. Configure the custom status to run for the scheduled meeting time and give your team full attention to focus on priorities.
Other users within your team also get more perspective on your response rate across mini-apps. They might also delay reaching out to you until your status changes to available/no status again.
Focus time
The focus time template is configured with inspiration from the Pomodoro Technique. Switch between focus time (no notifications) and available time (receive notifications) throughout your day.
It is best practice to take a longer break after 4 to 5 cycles. You can calibrate your focus time intervals with the different dynamic time slots to adjust this template to your personal preferences.
Available for chat
Provide your team with an indication that you are not in focus time and are available to chat. This can be at moments when you are not busy with a task, between meetings, ending or starting your day, or other moments where you want to highlight that you’re open to chatting.
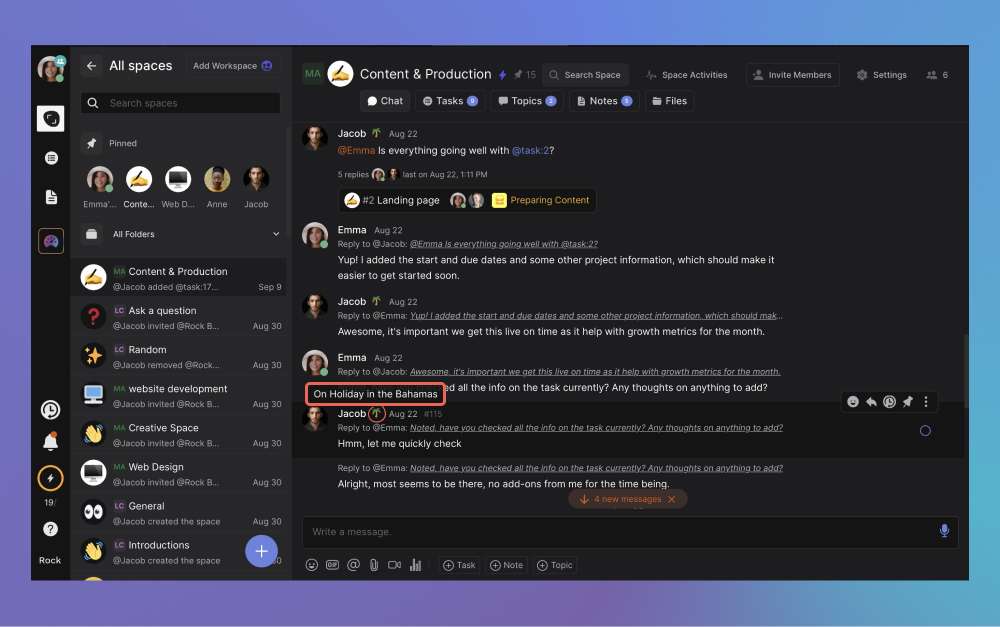
OOO
Whether you’re on holiday, running some errands, or taking the afternoon off, you can now clearly display this on your profile. Highlighting availability aids in shifting expectations and encourage asynchronous work.
Team members are also more likely to reach out to other available team members speeding up progress while you’re out while reducing the number of notifications you receive on your day off.
Questions & answers
The following section highlights a selection of frequently asked questions regarding the user status functionality on Rock.
What defines being online
A user will show up as being online when they have the rock client open on the web, desktop, or mobile apps.
The status will be configured as offline once the user logs out, closes the window, or exits the application on the mobile or desktop app.
Can I toggle the online status functionality of users outside my Unlimited plan?
No, it is currently not possible to enable online status for users outside of the Unlimited plan.
Is it possible to block my team members from turning their online status OFF?
No, while you can turn on the online status for your whole team in the user administration panel, they can still decide to manually turn the functionality off for their own profile.
We enable individual users to manually toggle their online preferences and bypass team configurations for privacy reasons.
Will turning on active status in a workspace turn it on for everyone if I’m the workspace owner?
No, active status in the workspaces panel is connected to your individual preferences.
Can I change the custom status of another team member?
No, it is not possible to change the custom status of another team member.


