As more and more teams begin to use Rock across multiple aspects of their operations, we realized the importance of making spaces easy to sort and sift through. Having numerous spaces can be overwhelming and challenging to maintain.
Workspaces, aims to help teams better manage spaces, members within spaces, and space invites. This makes onboarding new teammates, grouping spaces depending on function and focus, and keeping space notifications manageable easier across the board.
This feature is available on both free and paid plans. The main difference lies in the number of spaces you can add to each Workspace.
- FREE - 1 Workspace with up to 3 Spaces
- UNLIMITED - 50 Workspaces with up to 50 Spaces
Getting Started on Workspaces
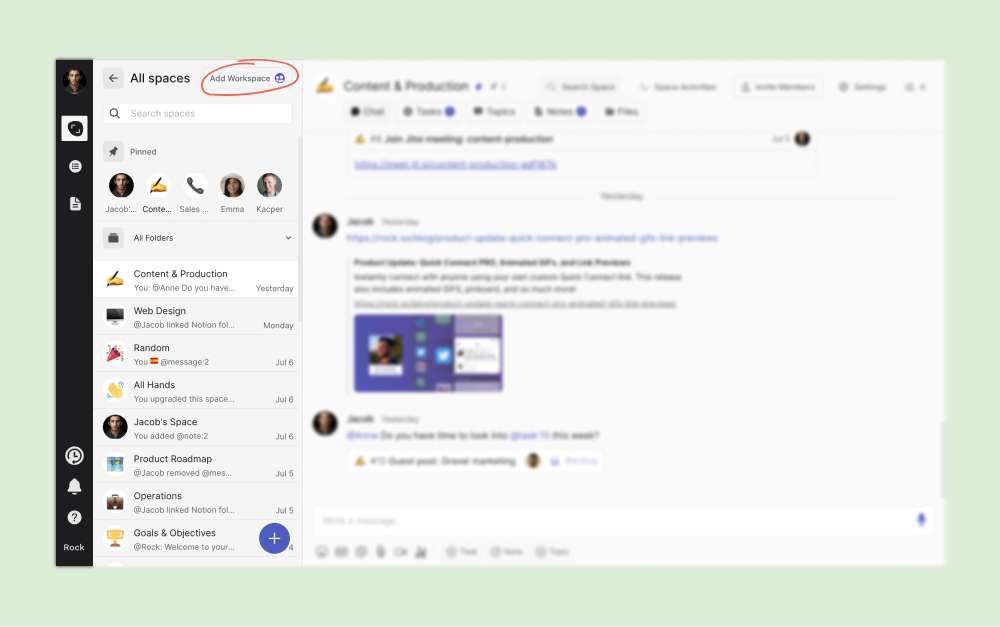
Before setting up your workspaces, Rock will list down all your spaces in one interface by default.
If you don’t have a Workspace, there will be an “Add Workspace” button beside the All spaces label on the upper part of your space list.
Clicking on the button will open the “Create a Workspace” prompt. You’ll need to add a Workspace name before proceeding. You can also opt to choose the workspace label color beforehand.

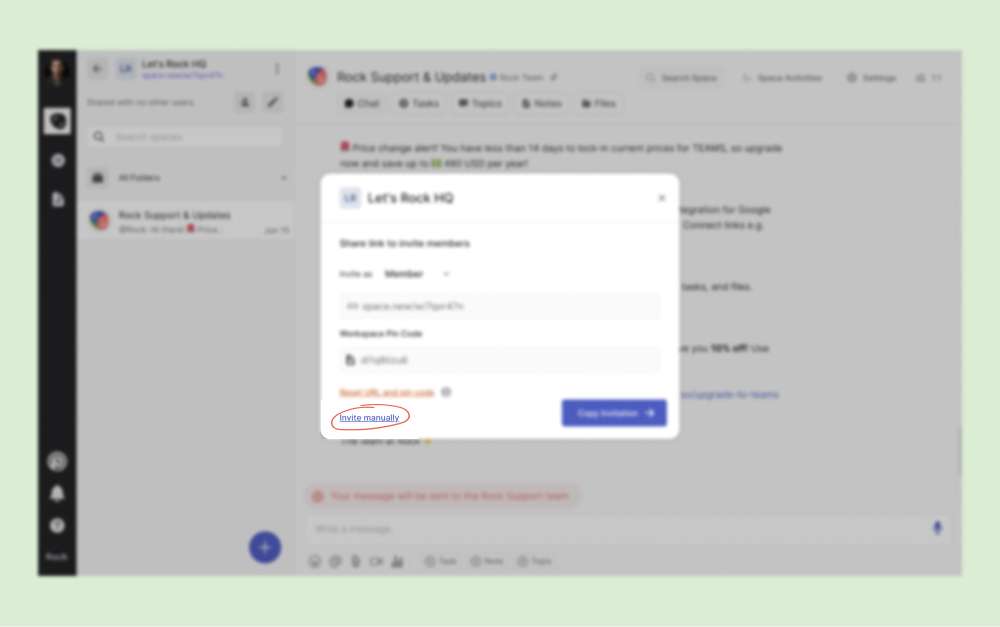
Once you successfully create the Workspace, you’ll see a window where you can set invite links so other people can join your workspace. You can set new workspace members as a member (those with edit rights) or a guest (chat/meetings rights only).

Each workspace has a unique link and pin. You can always reset the link and pin if you feel the workspace has been compromised. However, the existing link and pin will stop working, and you’ll have to send out a new invite containing the new link and pin. Don’t worry; you can change the invite restrictions and permits in the Workspace settings, and it will be discussed further along in this guide.

You can also invite Workspace members manually by clicking the “Invite manually” link.
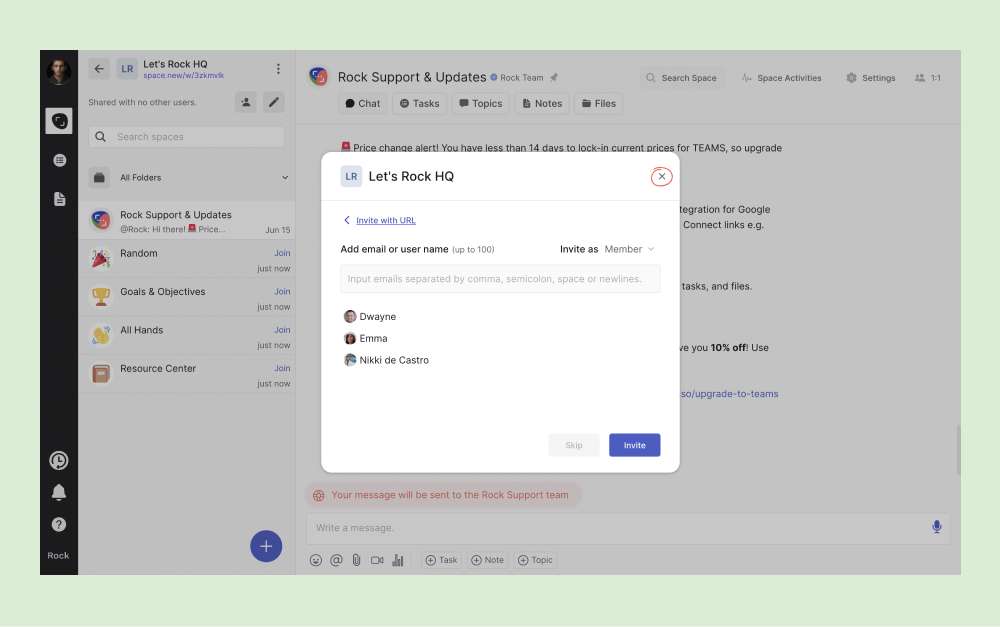
Clicking on the link will open a new prompt allowing you to input the username or emails of people you want to invite. You can also close the prompt by clicking on the ‘x’ on the upper right-hand side of the window.
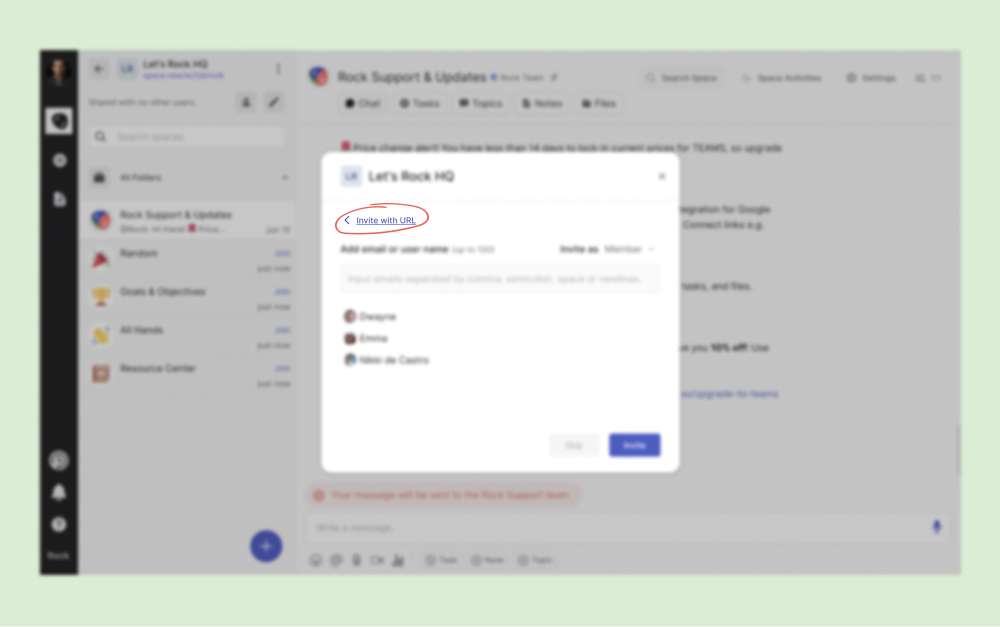
Clicking on the < Icon will bring you back to the original window, with the Workspace link and pin.
Once you close the initial Workspace invitation prompt, you can opt to add more spaces to your Workspace as well. You can always click the ‘x’ button on the upper right-hand side if you don't want to.
When you create a new Workspace, it automatically creates four spaces that we think might be beneficial for a Workspace. Namely: Goals and Objectives, Random, All Hands, and Resource Center.
Each of these premade spaces has its own premade notes and task lists to help you get started. Don’t worry. You can always delete these spaces if you don’t want to use them.

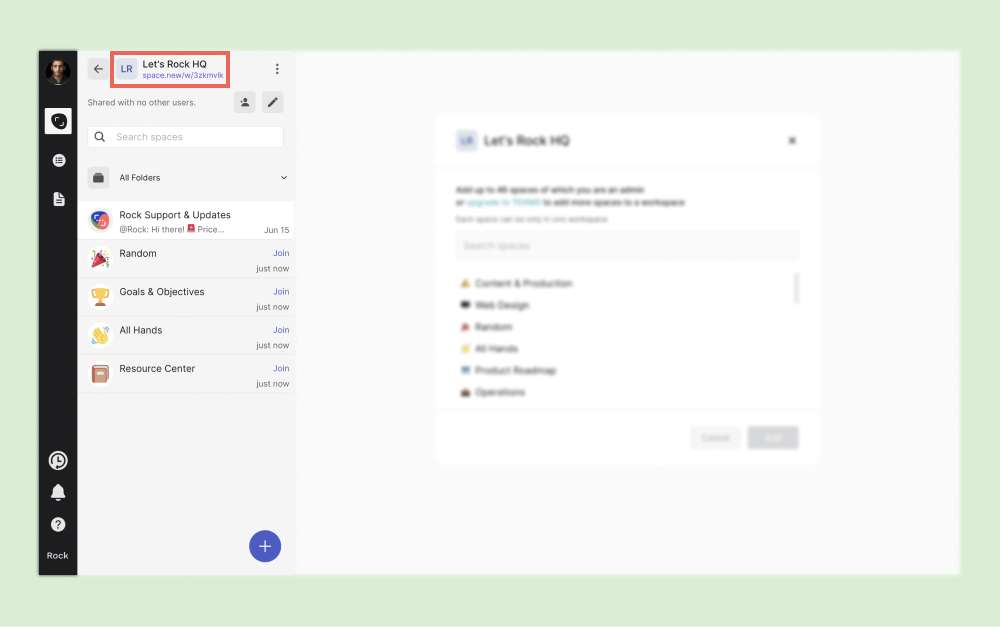
You can see your Workspace’s link on the upper part of the space list, right beside the Workspace name.
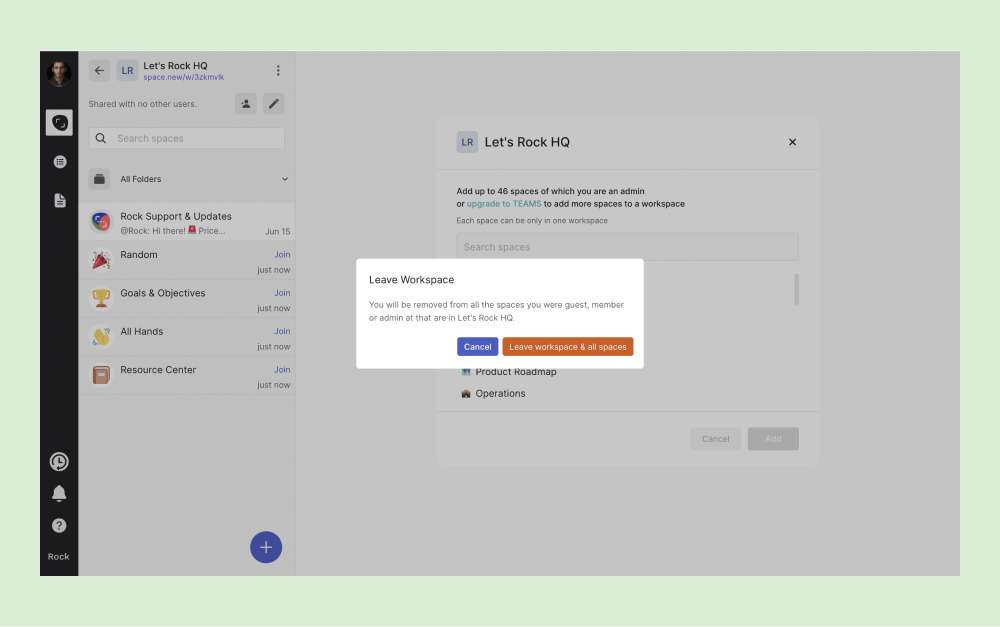
There is also the option to leave the Workspace. You can access this by clicking on the vertical “...” button beside the Workspace name and link.
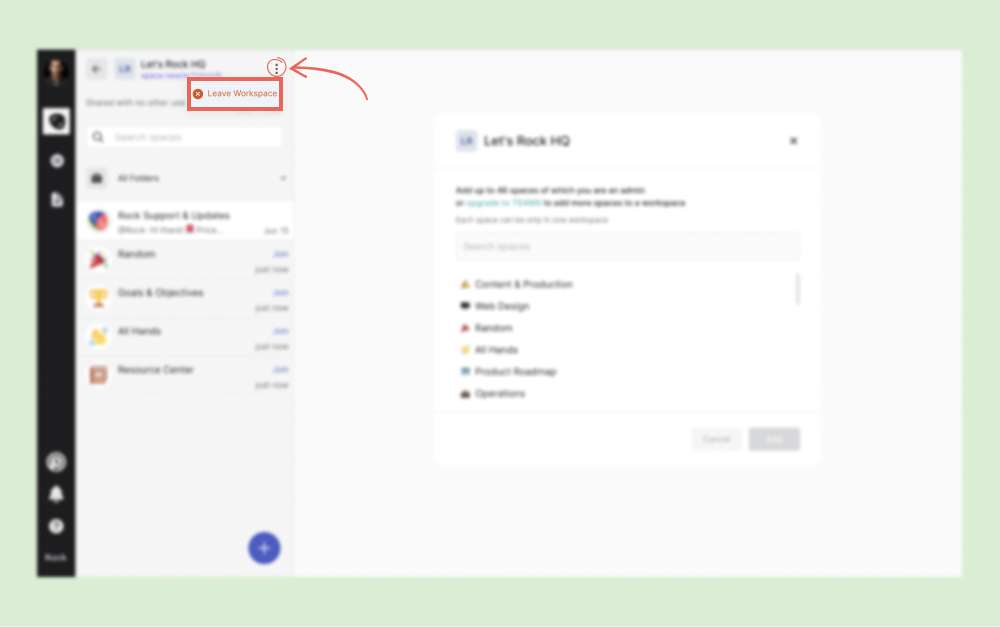
When choosing to leave a Workspace, you will get a prompt that will let you know that leaving a Workspace also means leaving all the spaces that are in the Workspace.
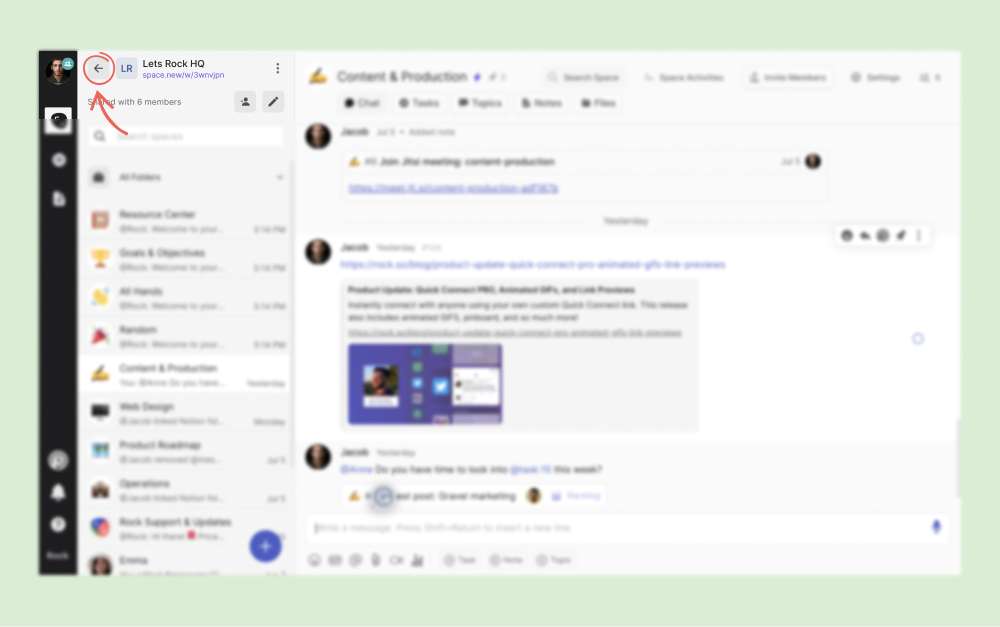
Clicking on the ⬅ button beside the space name will take you to the list of all your Workspaces.
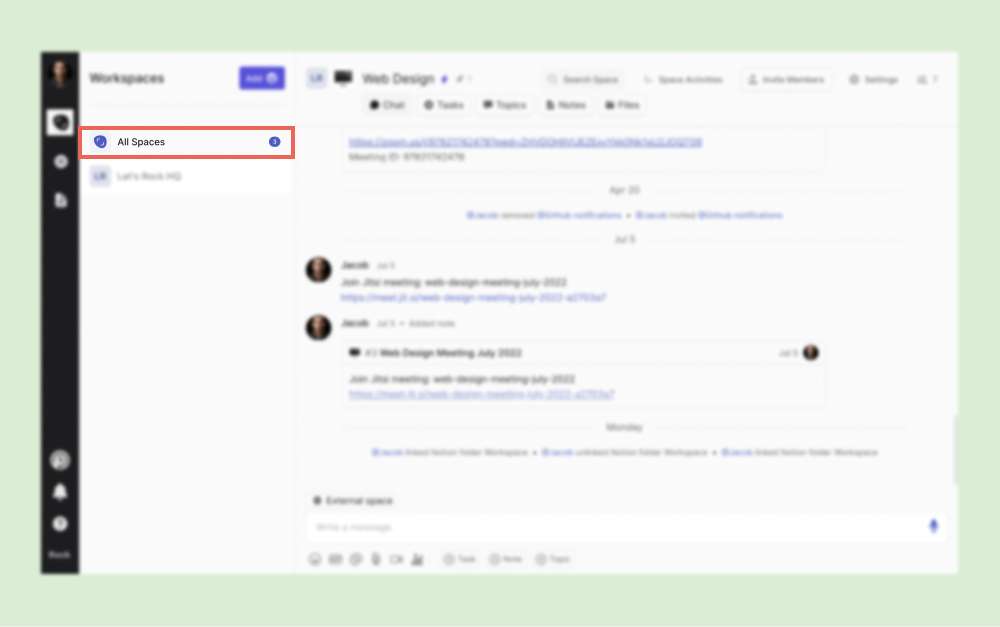
All spaces will list all the spaces you’re a part of, regardless of whether they’re in a Workspace or not.
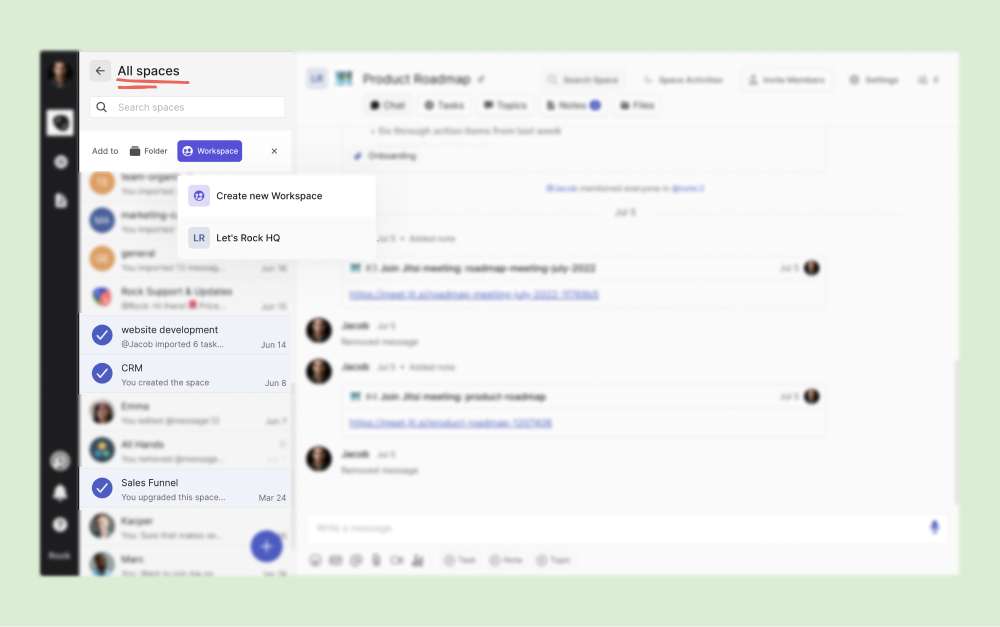
You’ll also have the option to select and add spaces to a Workspace from the All Spaces Workspace. All you need to do is select the space icon, and a checkmark will appear beside it. The “Workspace” button will also appear with the option to add it to an existing Workspace or create a new one.
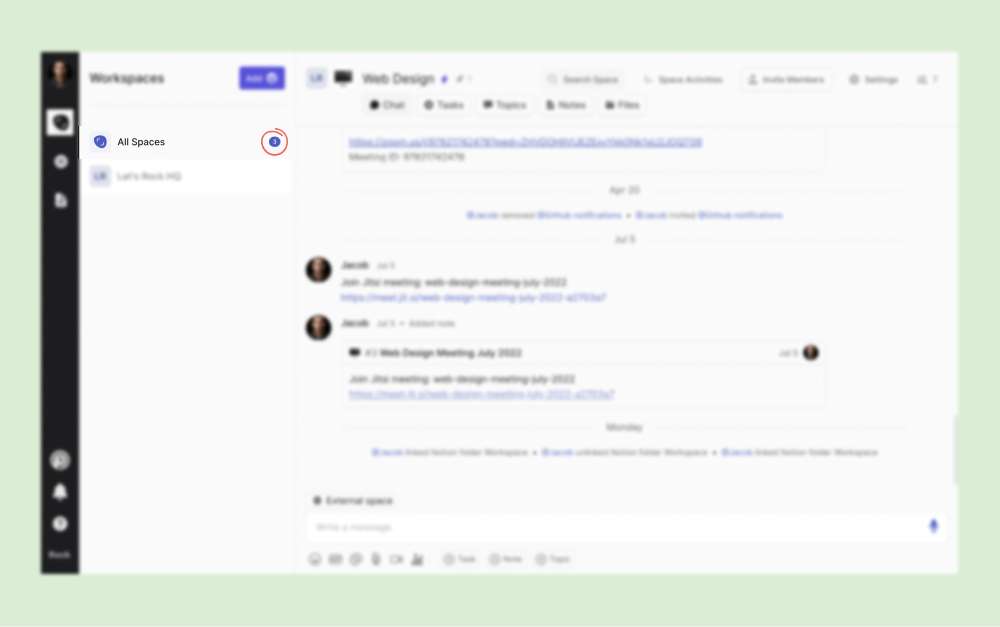
You can easily see unread activities on the workspace as there would be a blue dot displayed on the back arrow next to All Spaces/Workspaces. In addition, there would be a blue dot with the number of unread activities beside the Workspace name with unread activities on the Workspace list.
Making Changes to Workspaces
You can click the “Edit” button in the upper-right-hand corner of the spaces panel to add (or remove) spaces into Workspaces.
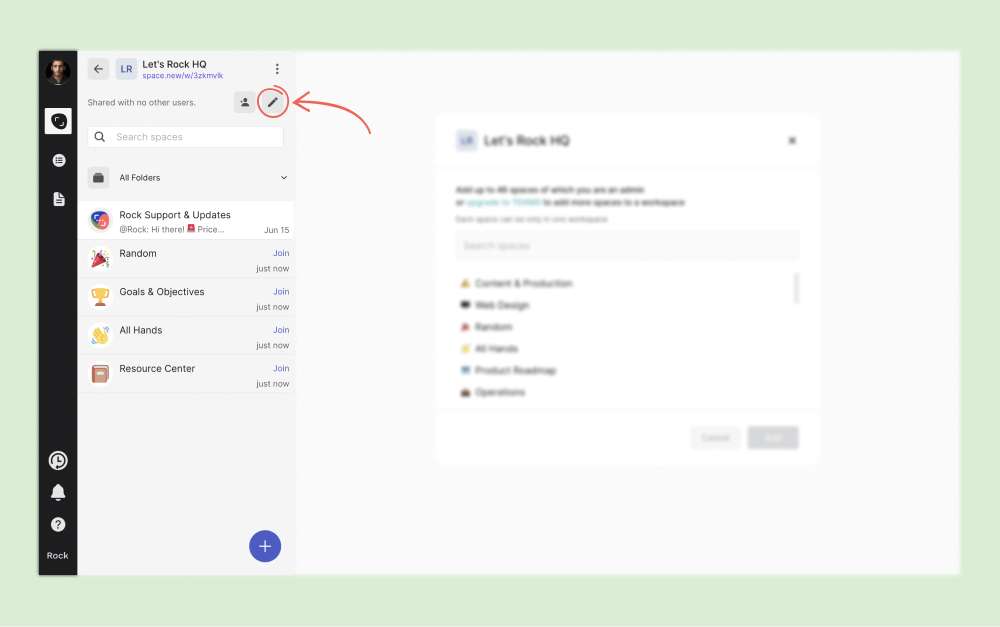
Once you click the “Edit” button, you’ll see four different options to make changes around your Workspace. We’ll explore each option separately below.
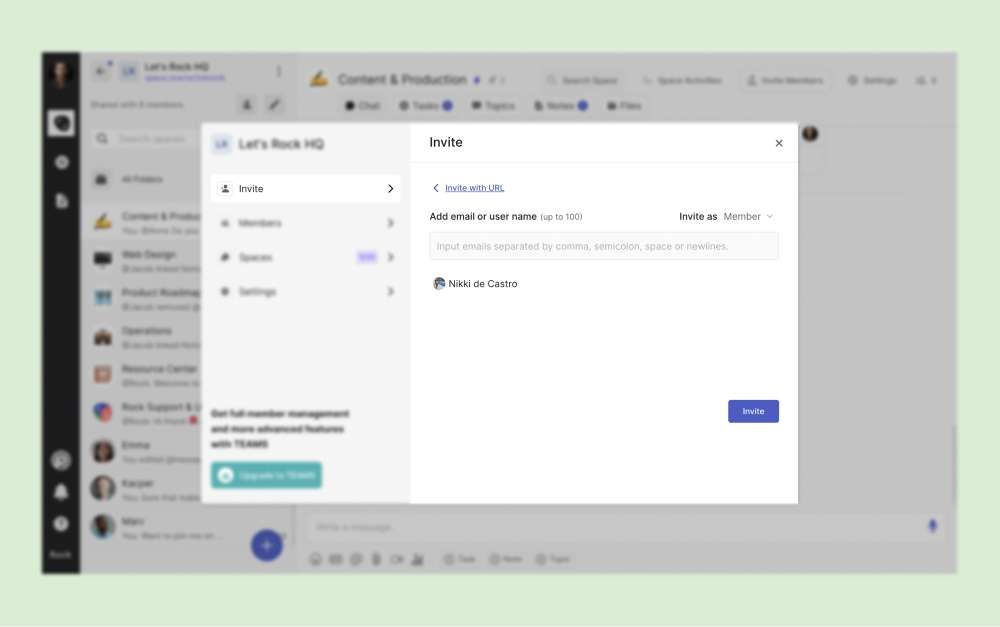
Invite
This tab shows the Workspace’s invite link and pin code. You can also copy your Workspace link invitation, reset your Workspace link and pin code.

You can invite people manually by adding their emails or usernames as well.
📝 Note: If a new invite to a Workspace is sent to you, a warning will be displayed on top of the spaces panel. You will join the Workspace automatically if an invitation comes from the same domain user. If it’s from another domain user, you will have the option to accept or decline an invite.
A red dot would be displayed on the back arrow next to the All Spaces/ Workspace name as long as you have an invitation pending.
Members
All members of your workspaces are shown in this tab. Members of spaces you’ve added to the Workspace are automatically added to the Workspace. The user roles of the members throughout the spaces of this WS will also be displayed (so if a user is a member in some and a guest in some other, there would be "Member, Guest" displayed next to that user’s name)

You can change people’s roles by clicking on the vertical “...” icon beside each role. You’ll also get the option to chat with the member (which opens a 1:1 space with them if you don’t have one yet), view the member’s profile, or remove the member from the Workspace.
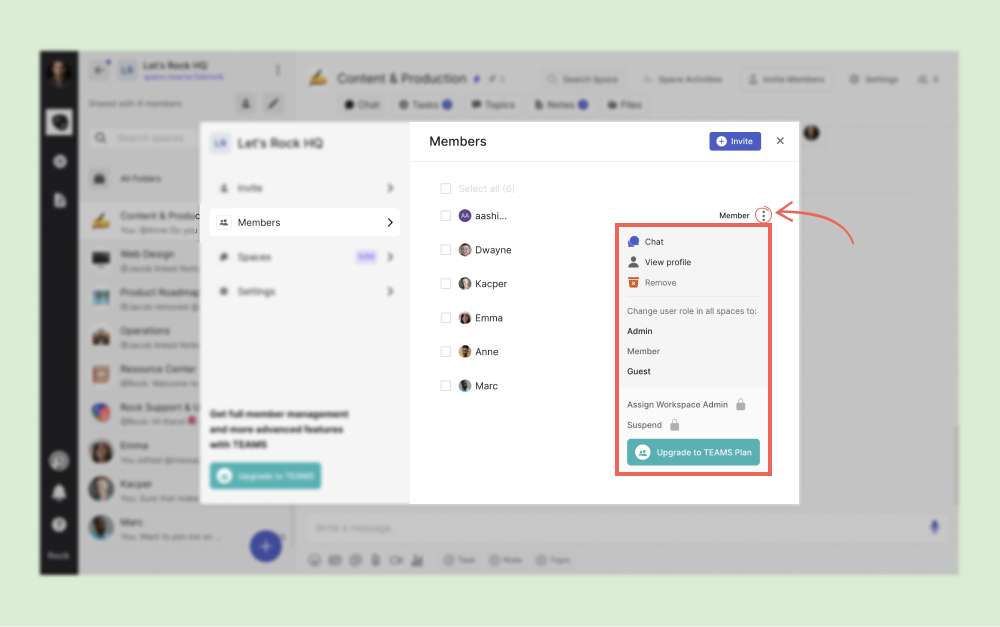
Remember that changing the role through this panel will reflect across ALL the spaces within the Workspace.
Spaces
Spaces that have been added to the Workspace are listed here. You can also see the workspace quota on the tab itself.
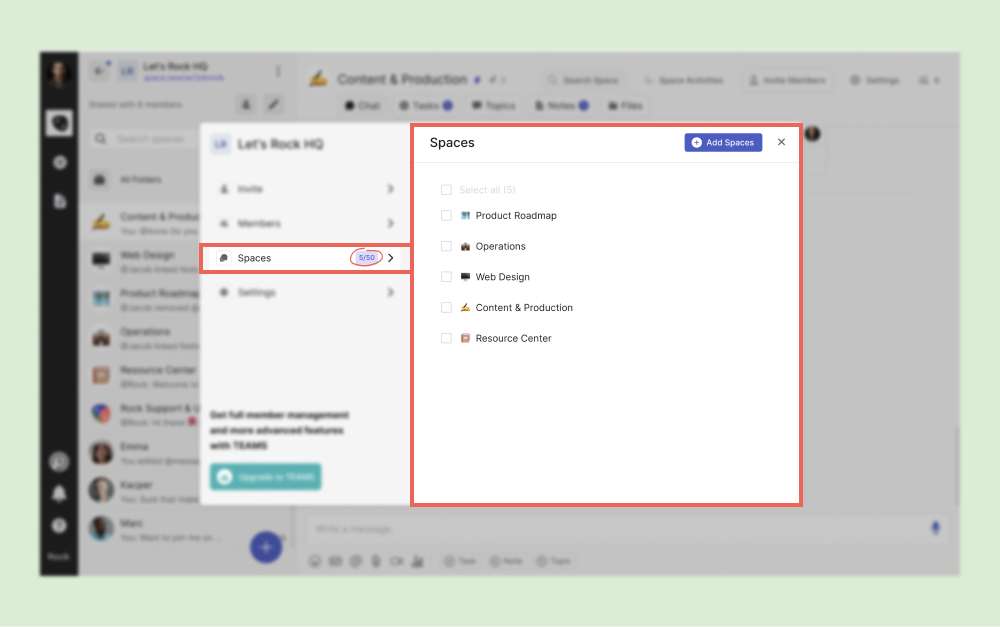
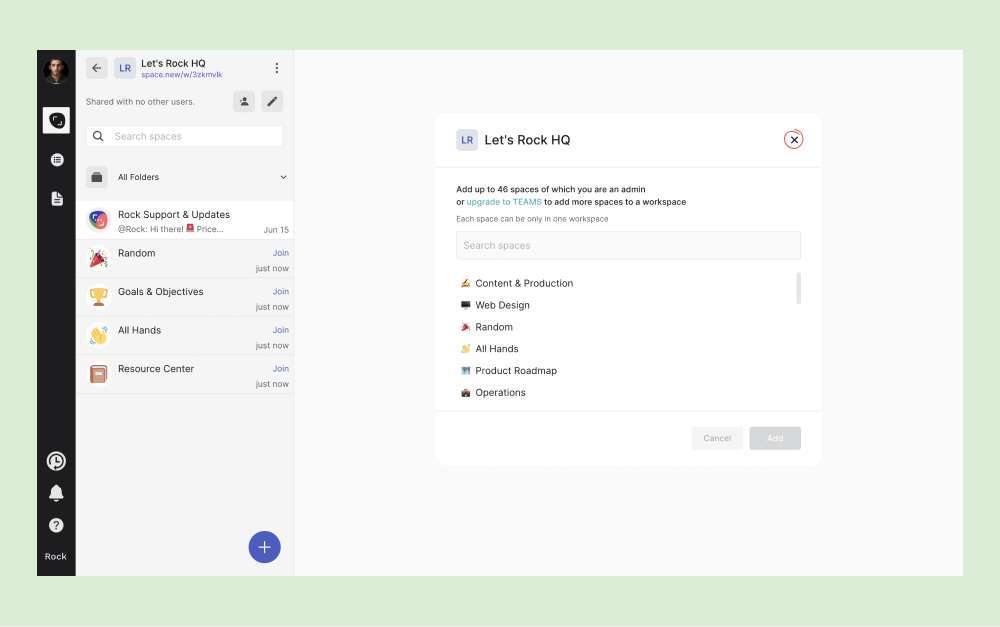
You can add spaces that you’re an admin of by clicking on the “Add Spaces” button.
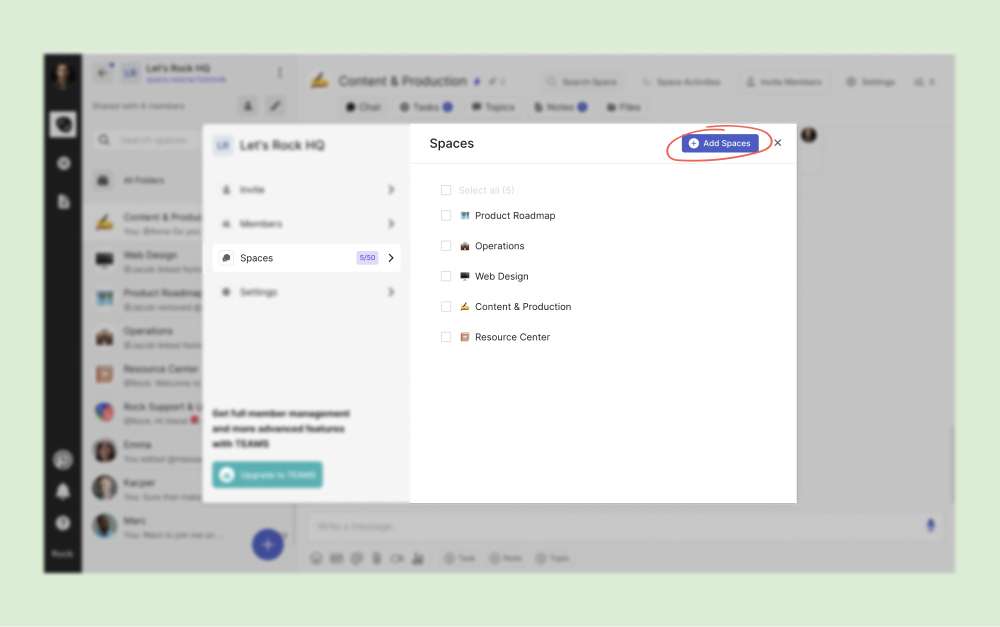
This then opens a panel that lists all the spaces you can add to the workspace. Spaces where you are an admin not yet part of the Workspace will be displayed in this panel.
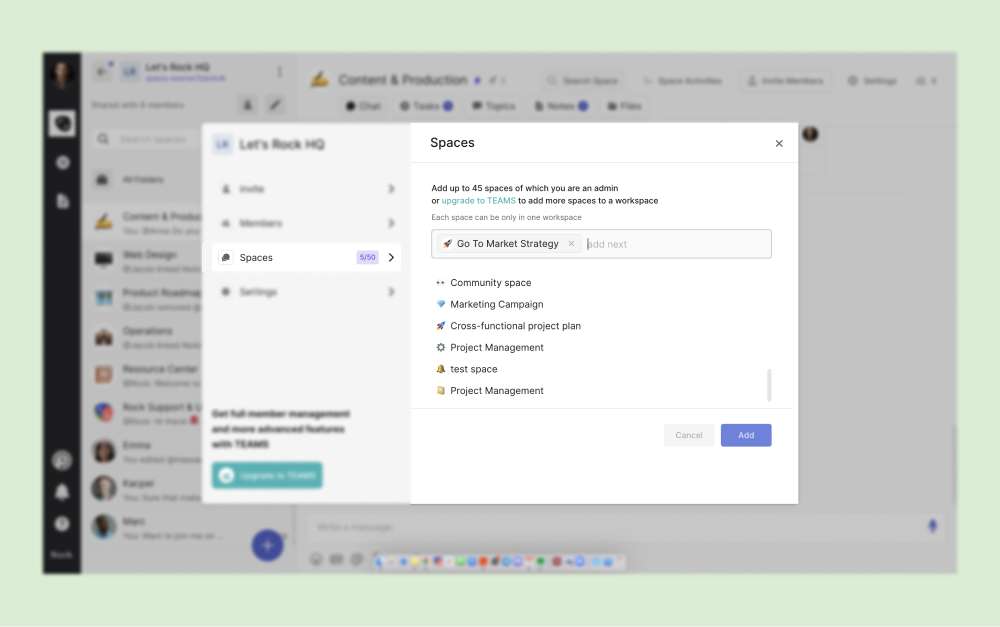
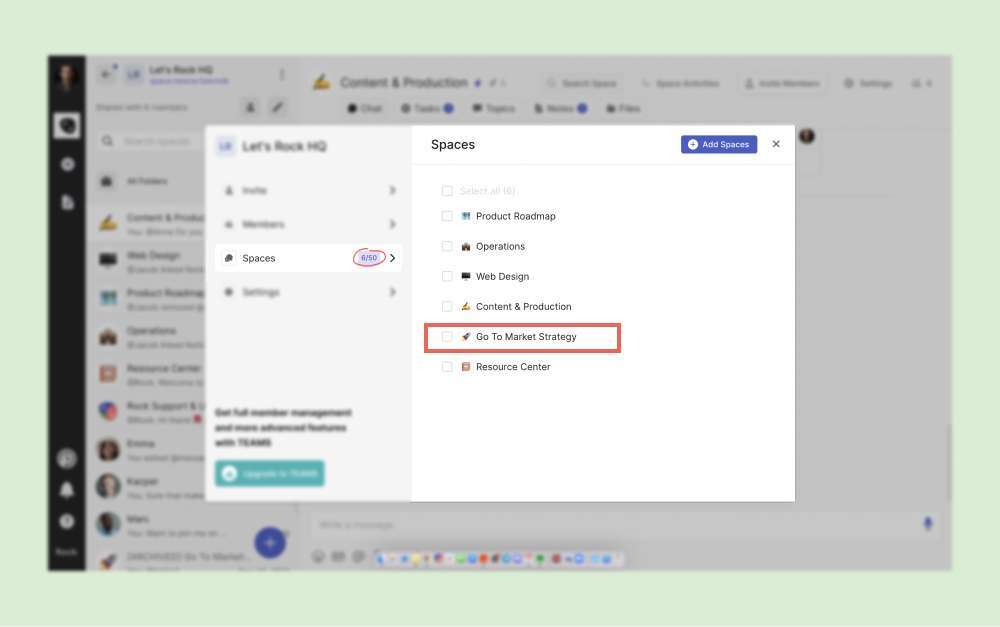
Once you select a space and add it, you’ll see it listed in the space list and will take up another space in your quota.
You can also remove spaces through this option by clicking on the checkbox beside each space name. Once you click the check box, an orange “Remove” option will appear beside the “Select all” option.
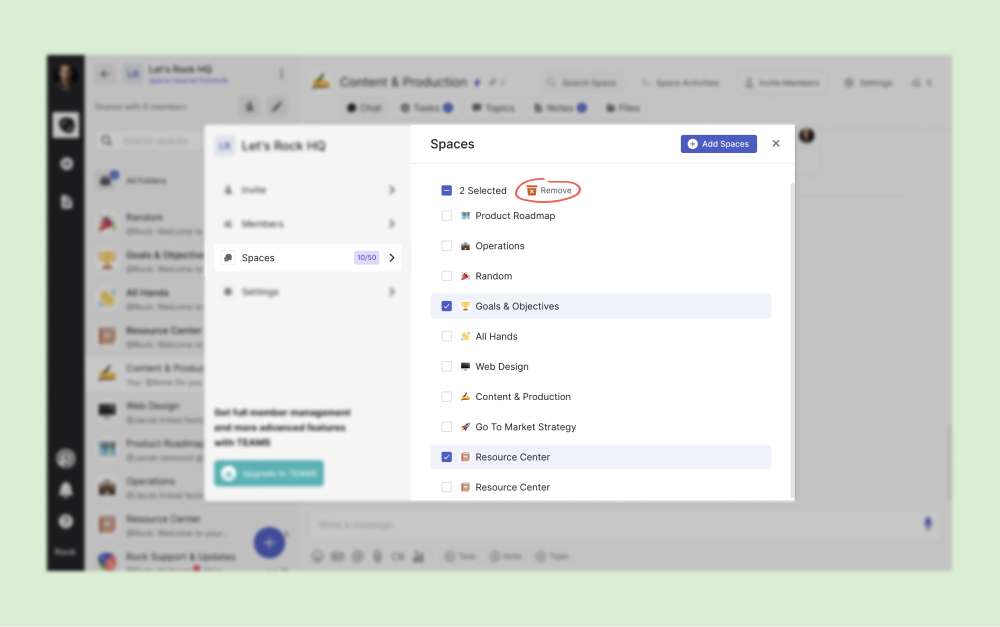
Once you click remove, the space will disappear from the space list, and you will free up slots from your Workspace quota.
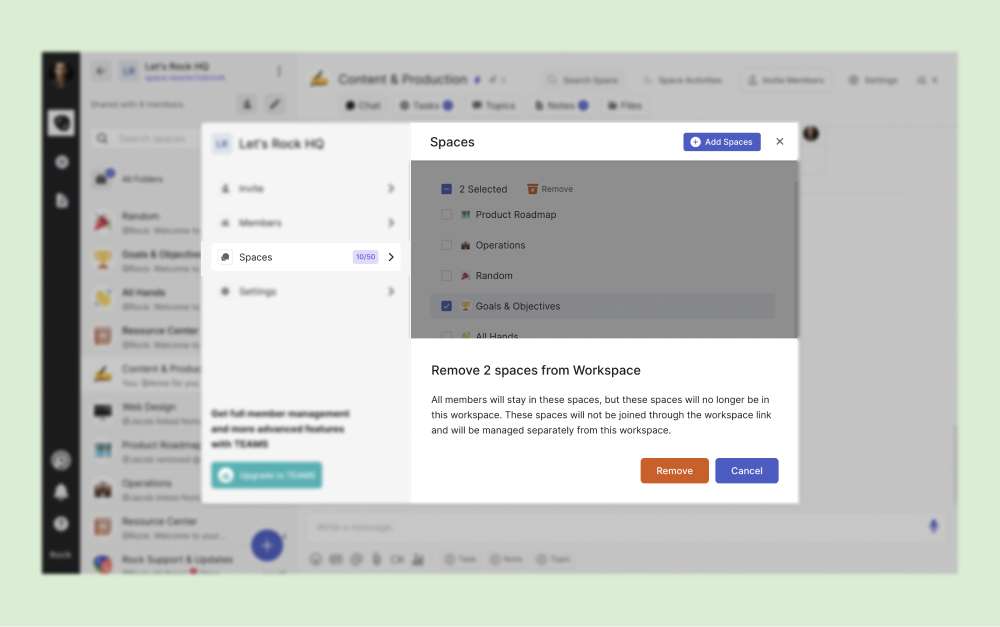
Remember that deleting a space from a Workspace does not delete a space or any members. The space will need to be separately managed from the Workspace.
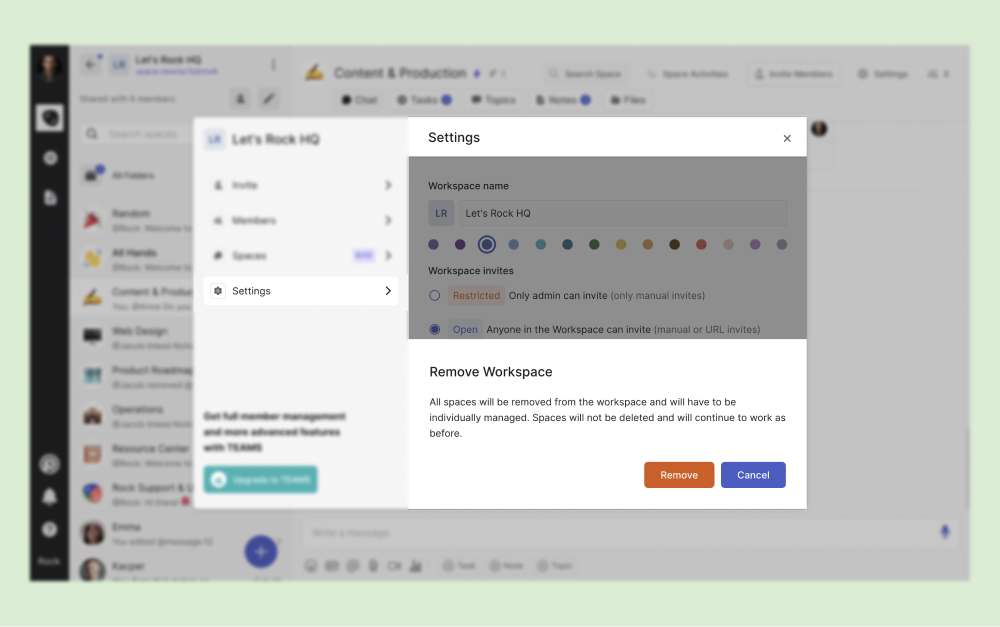
Settings
You can change your Workspace’s settings through this tab. You’ll be able to change the Workspace name, the label color, rules on who can send invites and set joining restrictions.
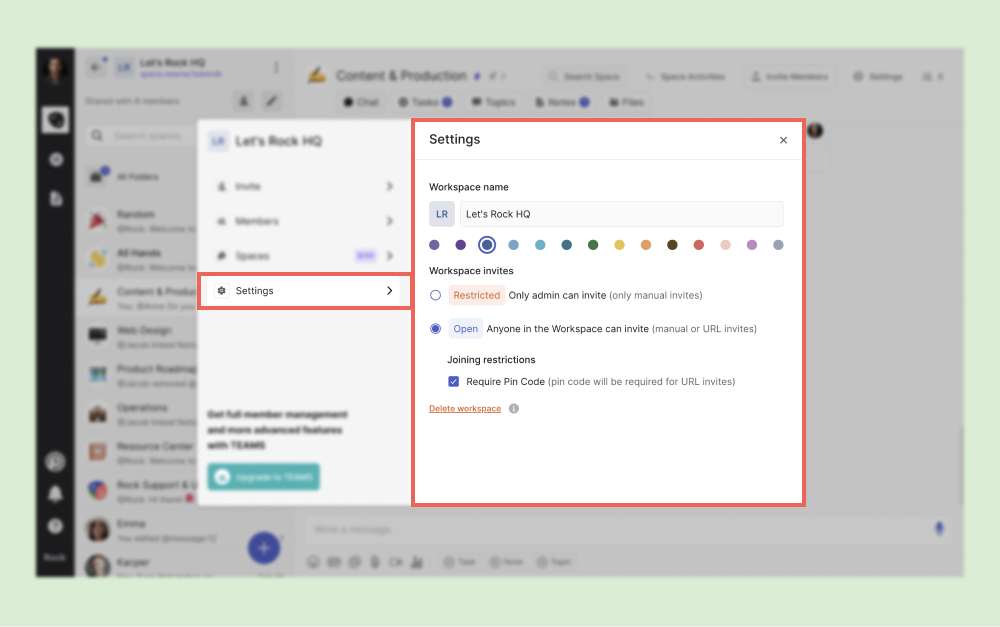
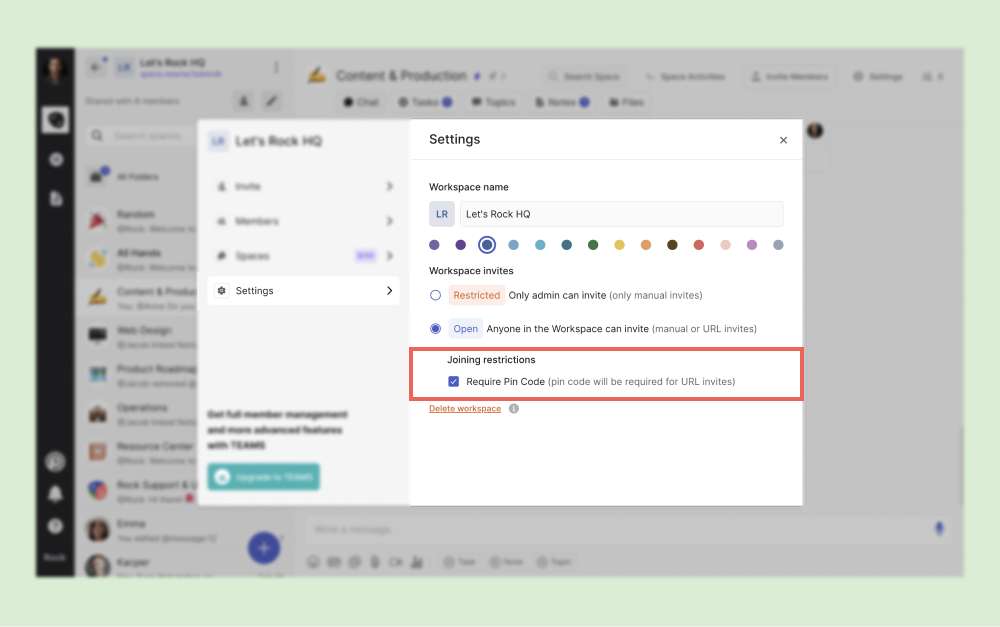
When it comes to joining restrictions, you can set how new members join and how they can join the Workspace.
- Restricted - Only admins can invite, and they can only invite manually
- Open - Anyone in the Workspace can invite (both manually and via URL)
You can also set whether or not you’ll need new members to input a pin code when they click on the link. This can be set by ticking the “Require Pin Code” checkbox.
The option to delete a Workspace is also here.
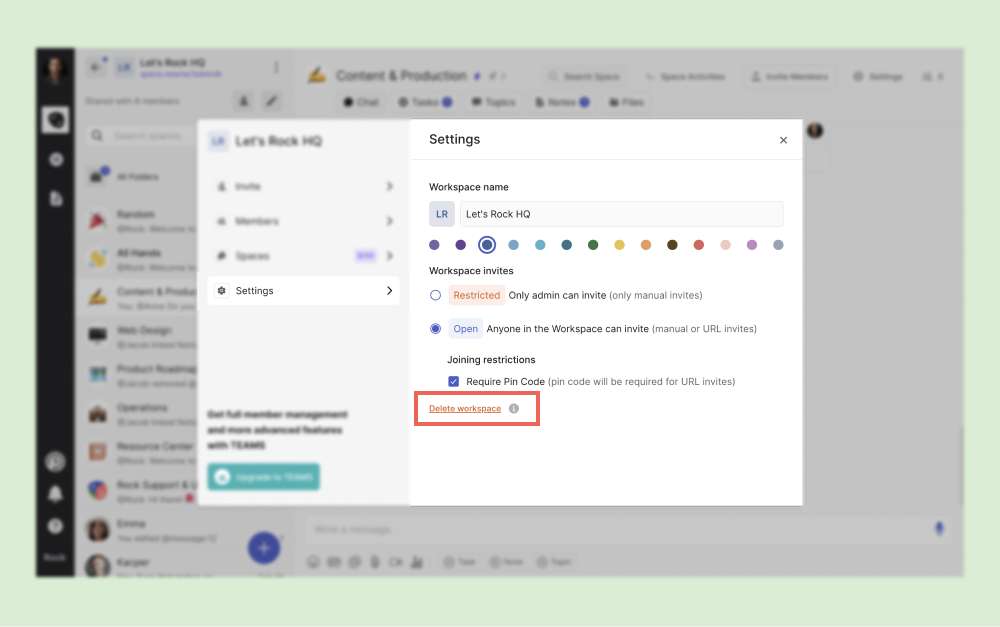
Once you delete the Workspace, all spaces will still exist but must be managed individually.
If you have any other questions on Workspaces, don’t hesitate to send us a message on the Rock Customer Support and Updates space.
Frequently Asked Questions for Workspaces
Can I put spaces in more than one Workspace?
No. Each space can only be put in one Workspace.
Can I set someone else as Workspace admin?
Setting someone else as a Workspace admin is only possible in Unlimited plan. On the FREE plan, you’ll have to remove the workspace, and somebody else has to create a new one from the same spaces so that that person can get admin rights to the Workspace.
Can other people see the 1:1 spaces I’ve put in a Workspace?
No, the 1:1 spaces stay between you and the other person in the space.
Do all the 1:1 spaces I have with people in the Workspace get put in the Workspace?
All 1:1 spaces with members of the Workspace are displayed inside the Workspace for your convenience.
What happens when there are a member is part of more than one Workspace with me? Does that mean their 1:1 space with me is duplicated into all the Workspaces?
1:1 spaces are just displayed inside the Workspace you share with the member for convenience. So it’s just the same space displayed in a different workspace.
What happens to members' roles in a space when I put the space on a Workspace?
The roles of the space members are unchanged when the space is added to a Workspace. It will only change if you change the roles through the member's tab.
What is the main difference between folders and Workspaces?
Workspace is a feature that allows you to share multiple spaces and invite multiple people to multiple spaces easily. Folders are your way of sorting out spaces in your account and cannot be shared with people.
Will members of spaces that have been removed from Workspaces also be removed as Workspace members?
No, the Workspace members will remain in the Workspace even though the spaces they were originally part of have been removed from the Workspace. Members can only be removed from the Workspace settings panel.
Can I duplicate spaces in a Workspace?
Yes, you can duplicate spaces in a Workspace, provided you’re a space admin and on a PRO or TEAMS account.
Do I have to be a member of all the spaces in a Workspace? Can I leave some of them?
Yes, you can leave separate spaces. As long as the space is in the Workspace and you’re a member of the Workspace, you will always have the possibility to rejoin spaces. However, if you’re a space admin, you first need to promote somebody else to admin.
Can you create spaces that are automatically a part of a Workspace?
Clicking the (+) button on the spaces list adds a new group space, but it's not yet bound to any Workspace, even if it is displayed at that time. This newly created space has to be moved to the Workspace either by selecting it from the space list and moving it to the Workspace or by adding it through the settings panel.


