Looking to personalize or make changes to your spaces in Rock? This product guide explains everything you should know about space settings in Rock.
Rock has five different kinds of spaces:
- Personal space: This space only includes you, so you can document or keep important information at hand.
- 1:1 spaces: This space was created for you to collaborate with only one other person.
- The ‘Rock Support & Updates’ space: Use this space to receive and share any information directly with the team.
- Group spaces: Work alone, with another person, or as many other people, in- and outside of your company.
- ‘All hands’ space: When you sign up with a corporate domain we automatically create an All Hands space so you can more easily connect with other users under the same domain.
You can access space settings in two ways in every space:
- Press "Settings" in the top right corner of your space.
- Press the name of the space in the top view.
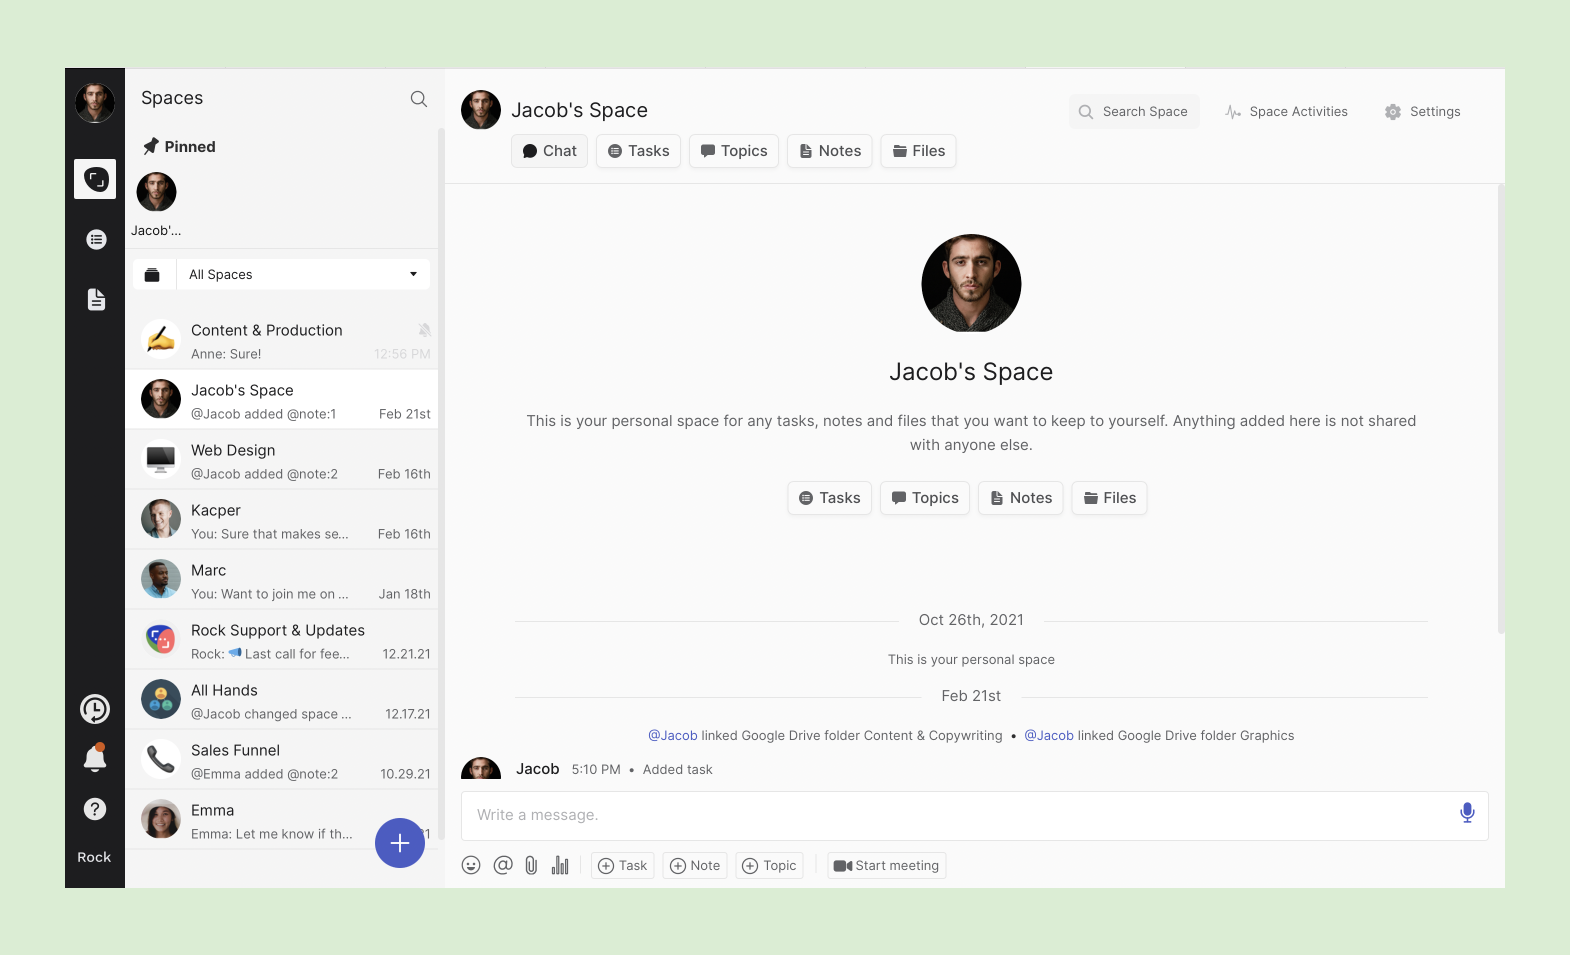
Your personal space
Your personal space is just for you. It is created when you first create your account on Rock. You can use the space to add any messages, tasks, notes or files you want to keep to yourself. If you want to share a task from your personal space with another user you can still duplicate the task across spaces.
Your personal space can’t be unpinned, hidden, archived or deleted. It will always be placed first in your pinned spaces section. There are no personalized adjustments in the settings of your personal space such as changing the name or description.
1:1 spaces on Rock
A 1:1 space is just for you and another user. There is no way to invite more people to a 1:1 space in the future. You can invite anyone to join a 1:1 space. Send unlimited messages, tasks, notes, files and meetings. 1:1 spaces are great for individual conversations with team members, clients, freelancers, partners or volunteers.
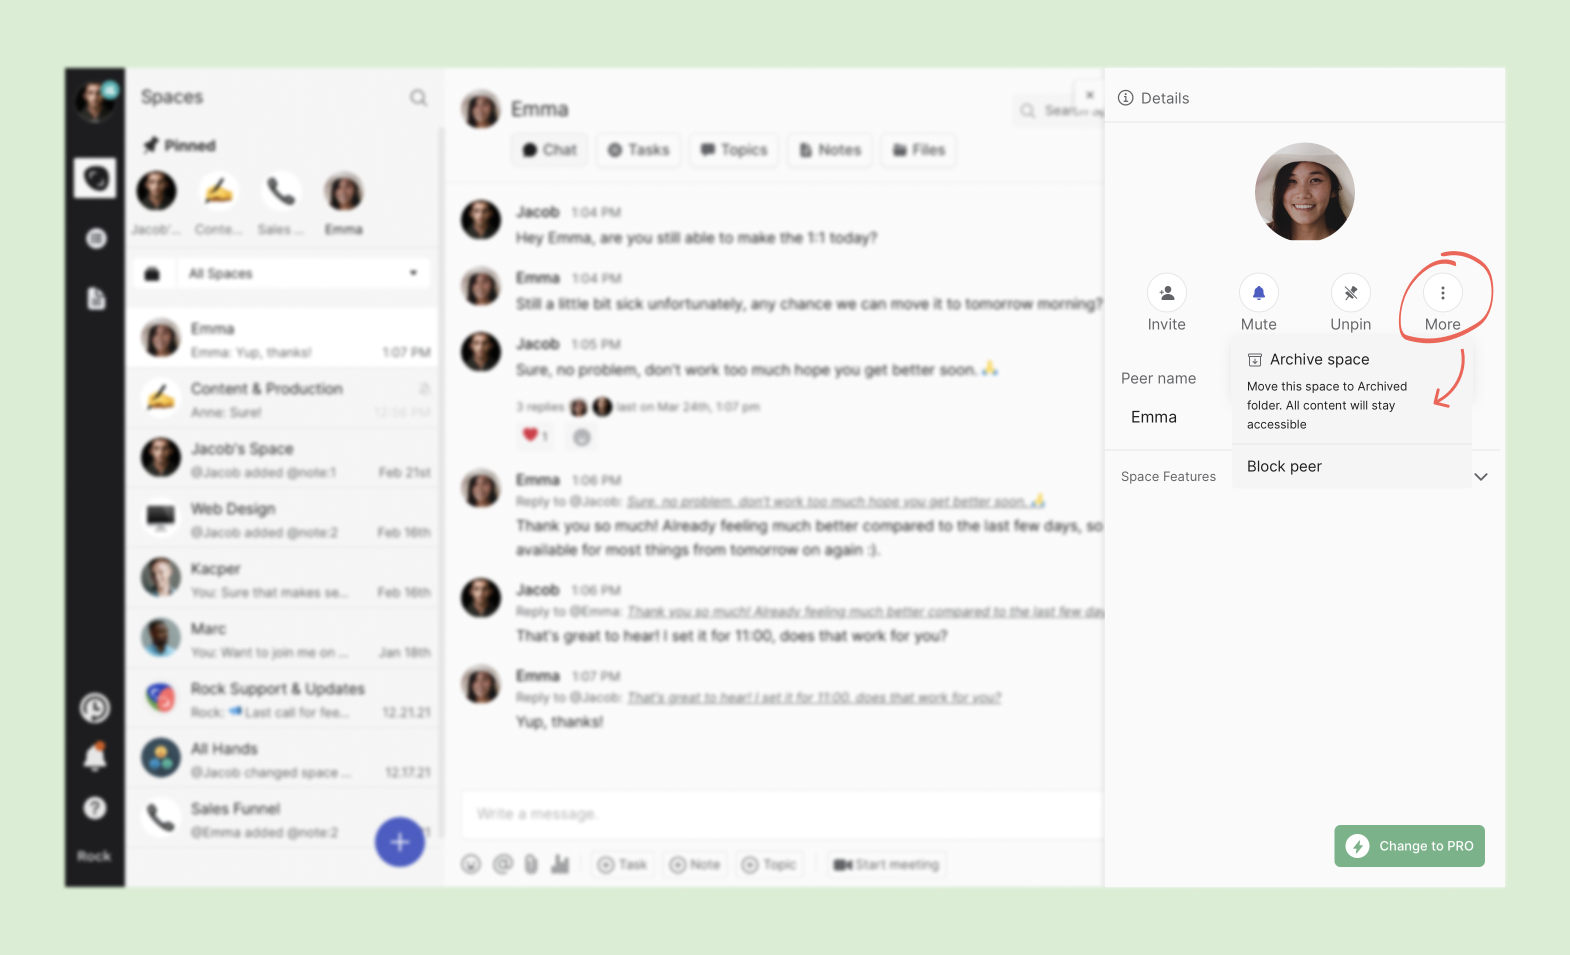
There are a few settings you can manually adjust in 1:1 spaces:
- Mute the space: This will block all space notifications until you manually unmute the space. Notifications from other (not muted) spaces will still work as usual.
- Pin/unpin: You can pin a space if you want it to appear in the "📌 Pinned" section in the top left corner of your screen. This allows you to always keep a space close.
- More: The "More" button provides you with two options:
- Archive a space if you plan to stop using a 1:1 space.
- Block the other user if you don’t want to receive 1:1 messages from them or want the space to disappear. Blocking a user does not mean they are blocked across all group spaces. You can unblock a user in the future if you want to do so.
Group spaces
Group spaces allow you to collaborate with as many people as you want. You can create them from a template, or create a completely new one. You can also duplicate them if you have the Unlimited plan. Just like 1:1 spaces you can mute the space if you don’t want to receive notifications and pin the space if you want to keep it close at all times.
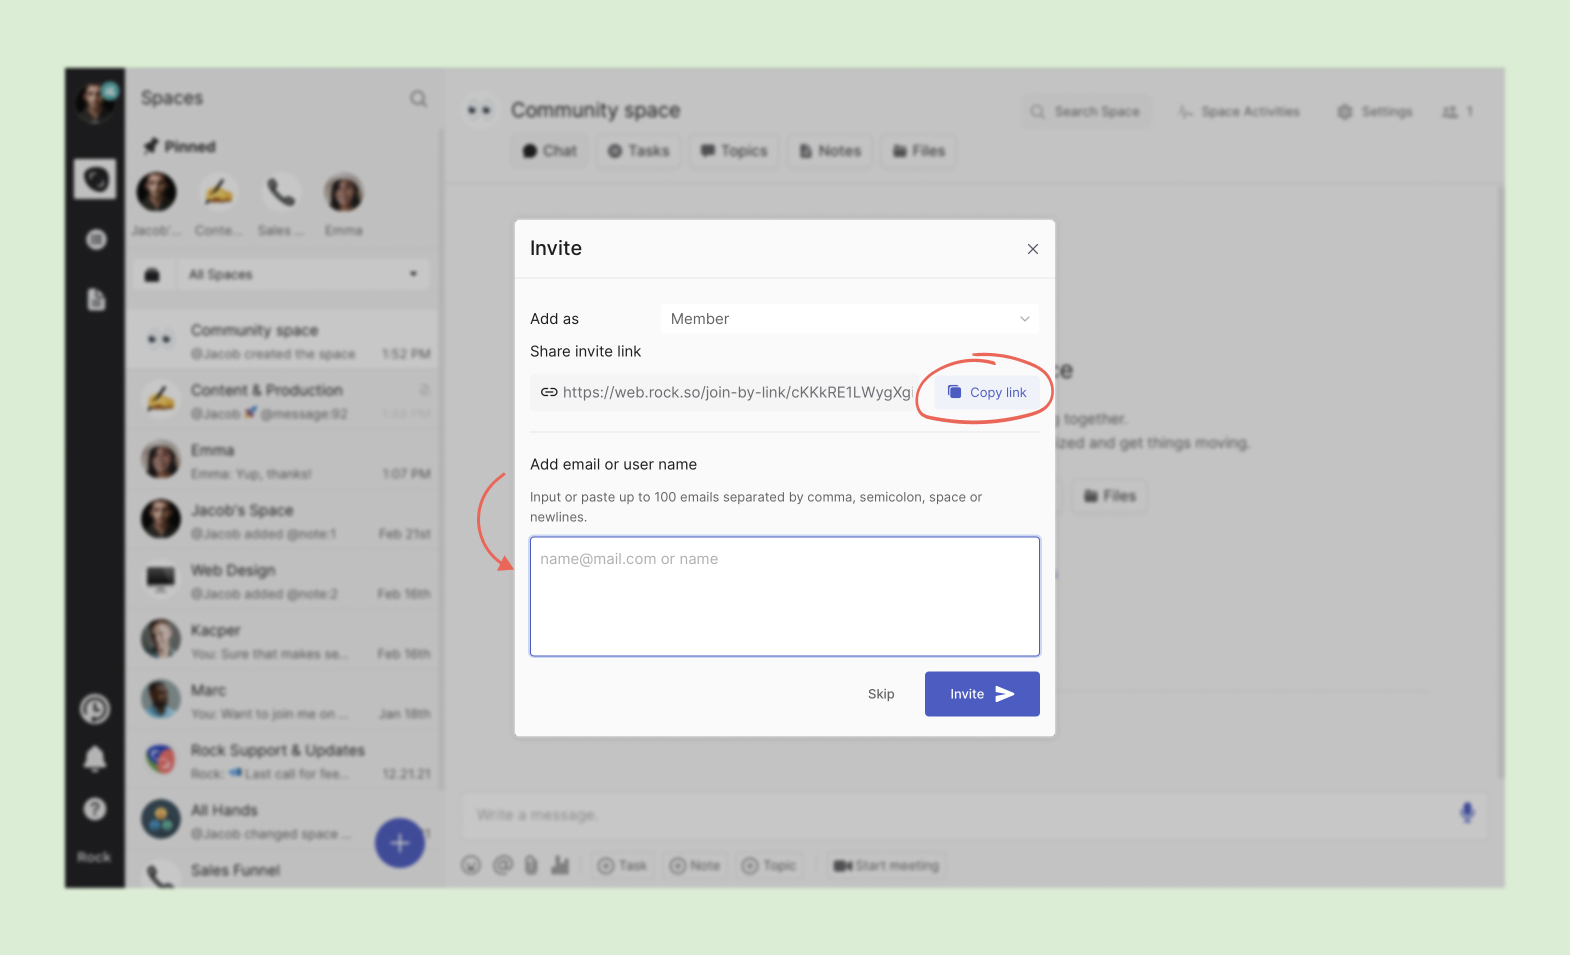
Once your group space is created you can add people by contact or email. You also receive an invite link which allows you to add members more easily. If you want to invite people later on you can do so from space settings.
Change your space icon
You change the icon of your space in two ways:
- Emoji library: Choose an icon from the emoji library. There are hundreds of options to choose from across categories!
- Device file: Upload a file from your device as the space image, you can adjust the corners to your liking. Make sure that the image looks good when shown in a circle as the corners will be cut.
You can change the icon as many times as you want, and you need to have member or admin permissions to change the space icon. Make sure to save your changes after you change a space icon!

Invite people to join your Group spaces
You can invite as many people as you want to join your Group spaces. Make sure that you are either a member or admin if you want to add new users. There are two buttons to add new users. One is in the top left of the space settings panel. The second is in the bottom, right under "Members".
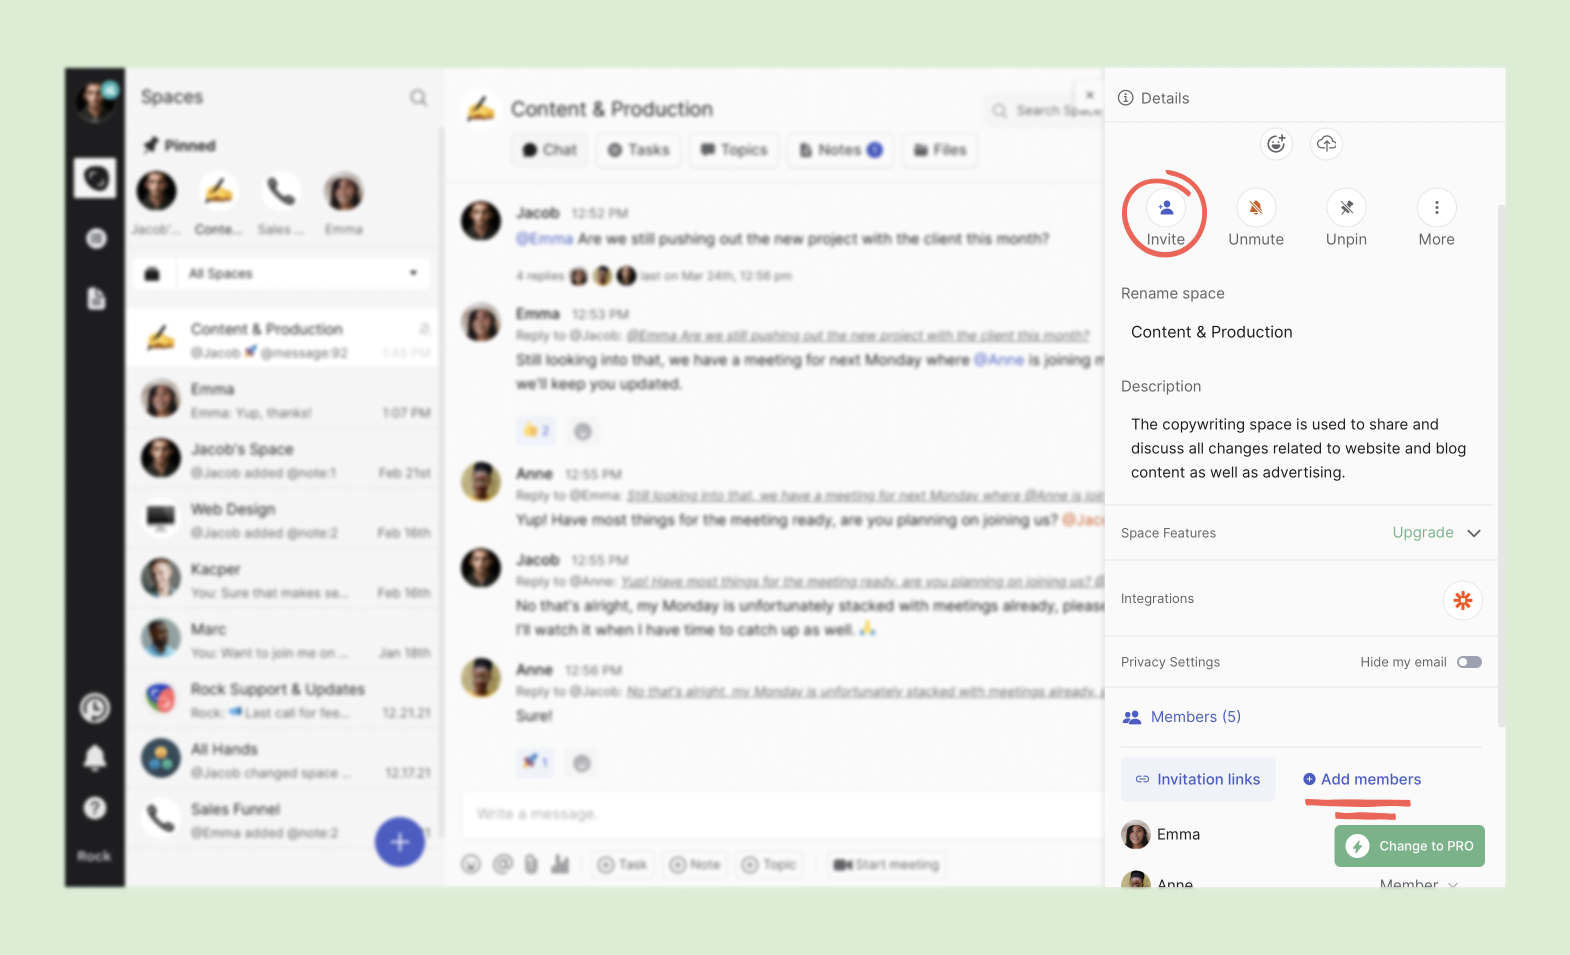
After pressing "Invite" or "Add members" a new panel will appear. On the FREE plan you can add up to 5 people per space. The Unlimited plan allows you to ad an unlimited number of people.
If you are planning on adding a large number of people to the space you can paste up to 100 emails separated by commas, semicolons, spaces or new lines.
You can only add users as members or guests when initially inviting them. Click on the dropdown to toggle between the two options. After they join the space you can upgrade users to admins if you are an admin yourself.

Add users through invite links
Add users from the web, social media, discussion boards or anywhere else through invite links. Admins and members can access invite links in the space setting under Members. The option will disappear for members if admins disable this feature for a space.
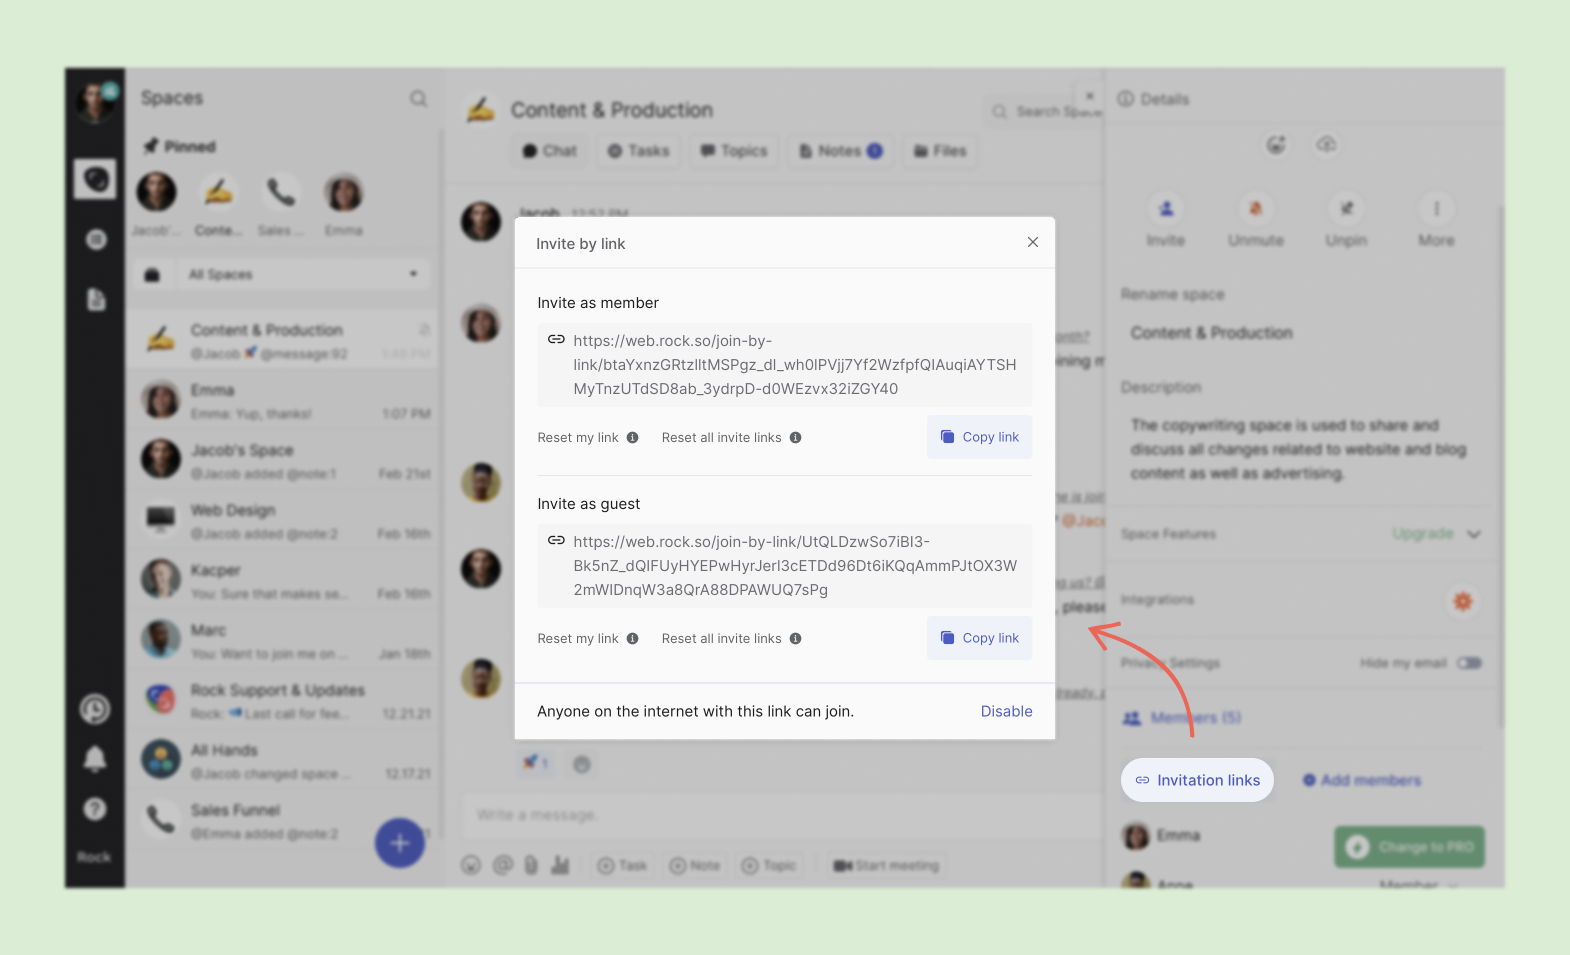
It is not possible to create an invite link for admin status, but you can always upgrade a user once they join the space if you have admin permissions. There are a few options in the panel:
- Copy link: Copy your invite link either by pressing the Copy link button or by selecting the URL and saving it.
- Reset my link: Reset your own link, so your current link stops working
- Reset all invite links (admin only): Reset all the links in the space, so any existing links stop working.
- Disable (admin only): Remove the option to enter a space through a link completely. The panel will disappear for members and any existing link will stop working. Admins can always turn the option back on if needed. Note that new links will be generated once enabled again, and past links will still not work anymore.
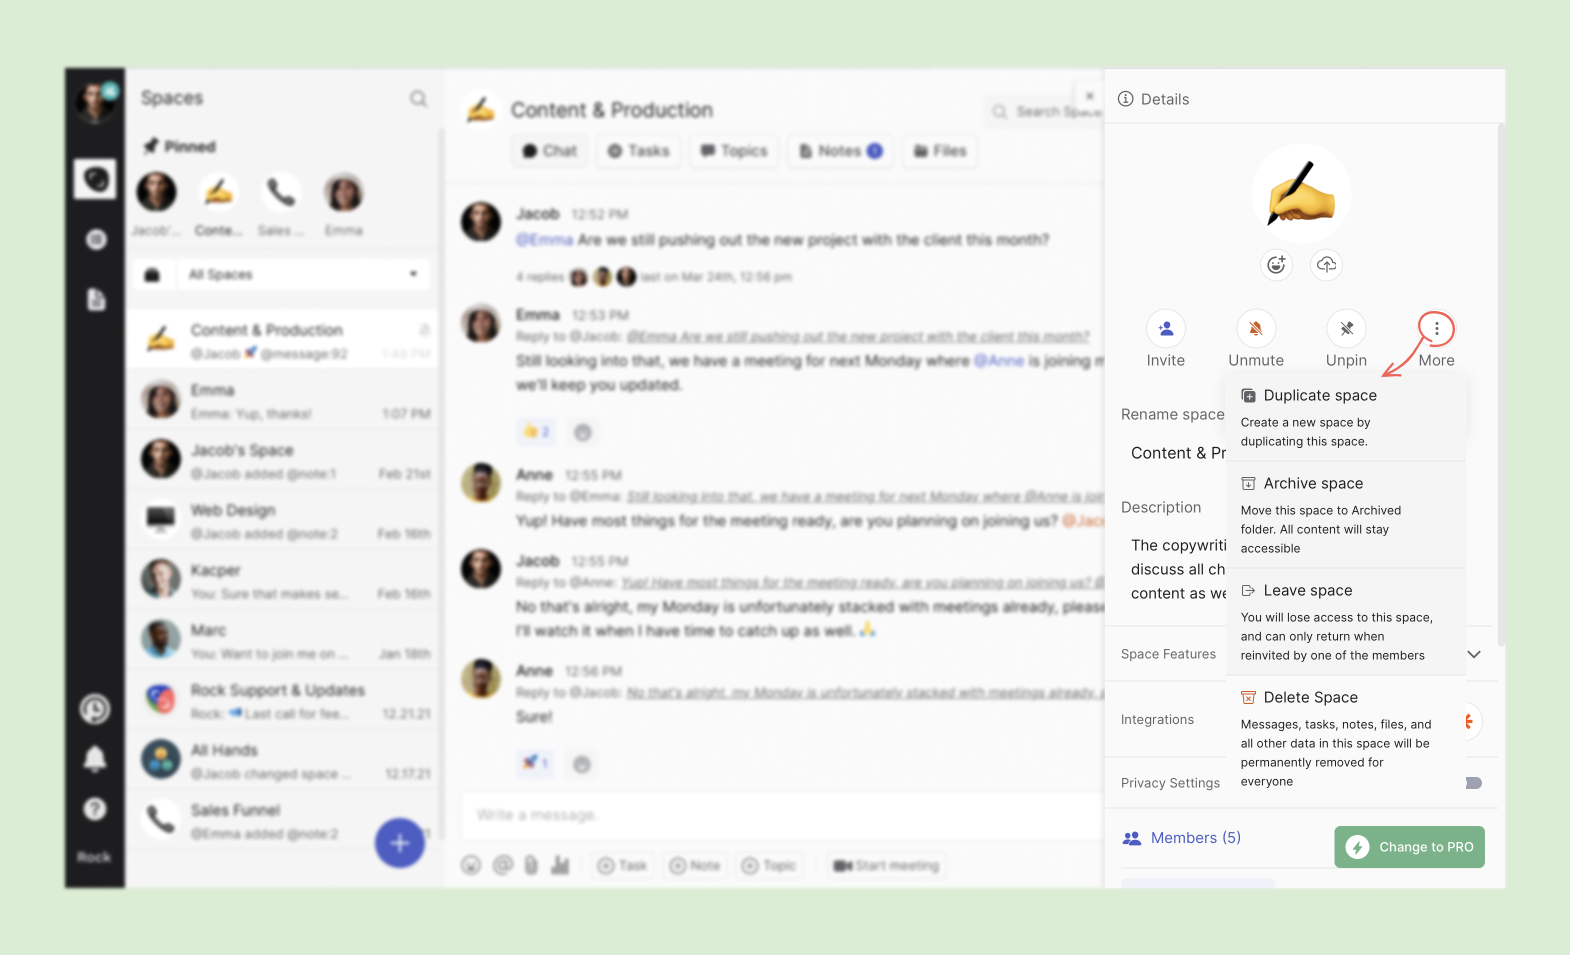
Leave, archive, delete or duplicate spaces
Admins have four advanced space settings open up when pressing "More" in the top right corner of your space settings:
- Leave a space: Leave a space if you don’t want to be part of it anymore. You can only rejoin a space if a member or admin invites you back.
- Archive space: If you don’t want to see the space anymore or a project has been completed, you can always archive the space. This way you don’t lose the conversations, tasks, notes and files in the space.
- Delete space: Note that you must be an admin to delete a space. After pressing "delete space" we ask you to confirm once in Rock and once through your email. Deleted spaces, including its contents, cannot be retrieved. So make sure you don’t want to use it anymore.
- Duplicate space: Note that you must be an Unlimited user to duplicate a space. You can move over all tasks and/or notes to a new space.
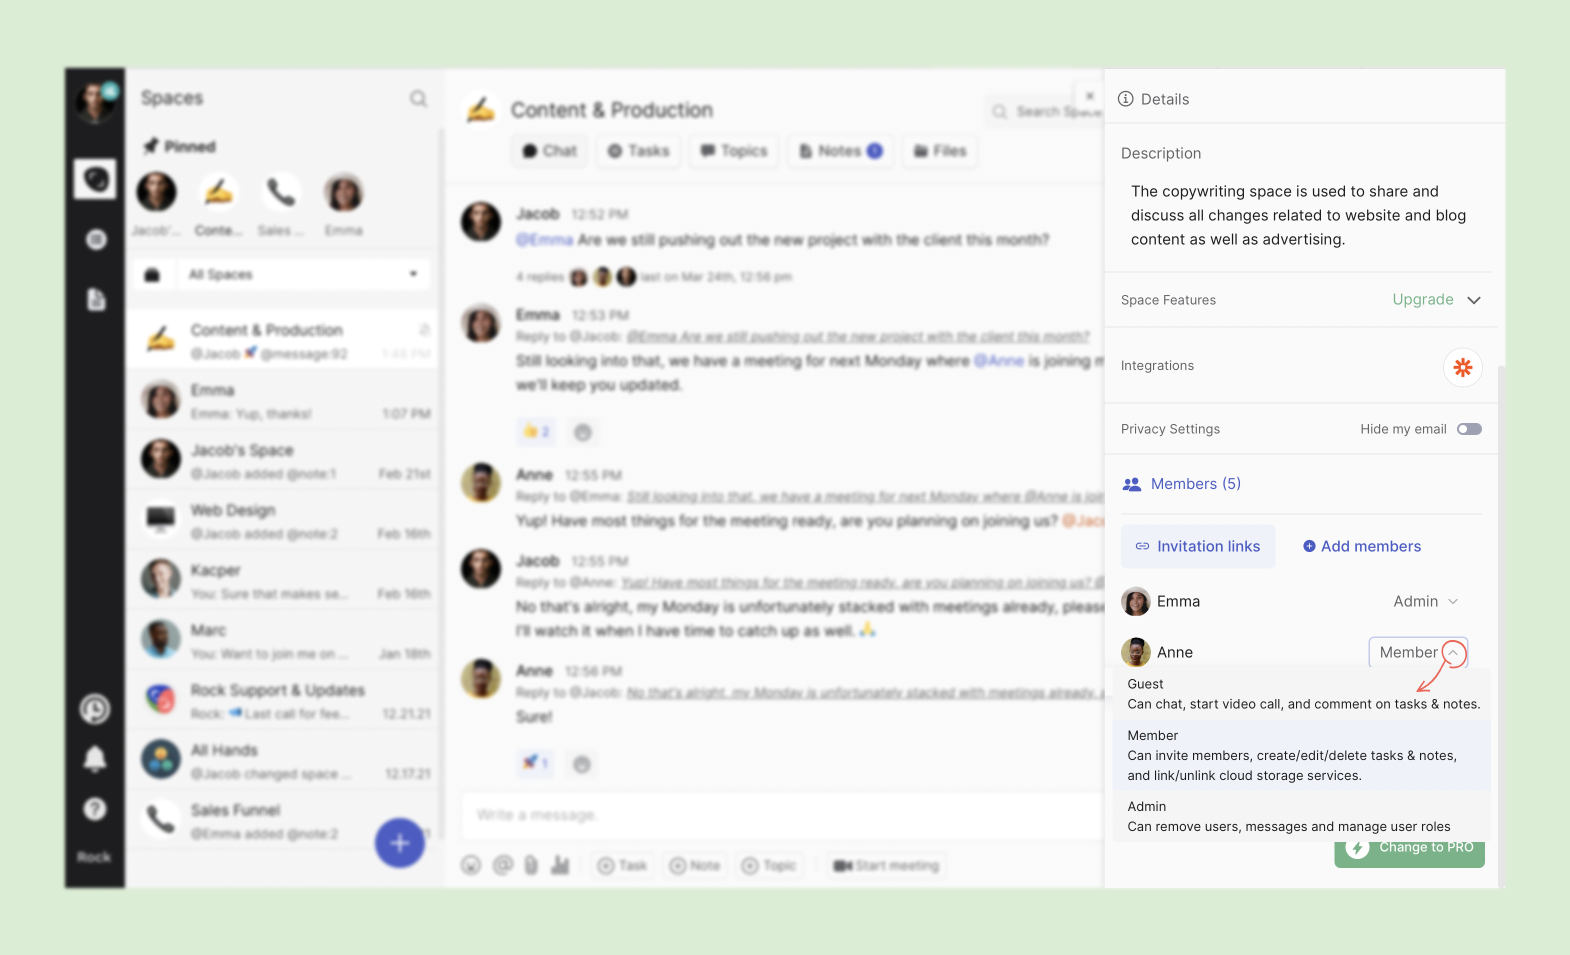
Change member roles
If you want to give a user more or fewer permissions you can manually change their role. Note that you must be an admin to change member roles, select the dropdown arrow next to the user and select their new role:
- Guest: Guests can chat, start video calls, and comment on tasks & notes. They can also delete their own comments and messages. If guests try to edit or create new tasks, topics or notes their changes will not save. Guests will only be able to remove a folder if the user added a folder while in a different membership tier and was later demoted to guest.
- Member: Members can invite new members and guests, create/edit/delete tasks, notes, and link/unlink cloud storage providers. Members can only edit the description of a topic if they created it.
- Admin: Administrators have all member permissions. Additionally, they can remove users, messages and manage user roles. Only admins can upgrade spaces to PRO and add new integrations.
Remove users
This feature is only available for users with admin permissions in a space. Users can be removed by pressing the icon which appears when hovering over their name in the member list. Note that users are directly removed after pressing the icon. You can always invite users to join your space again in the future.

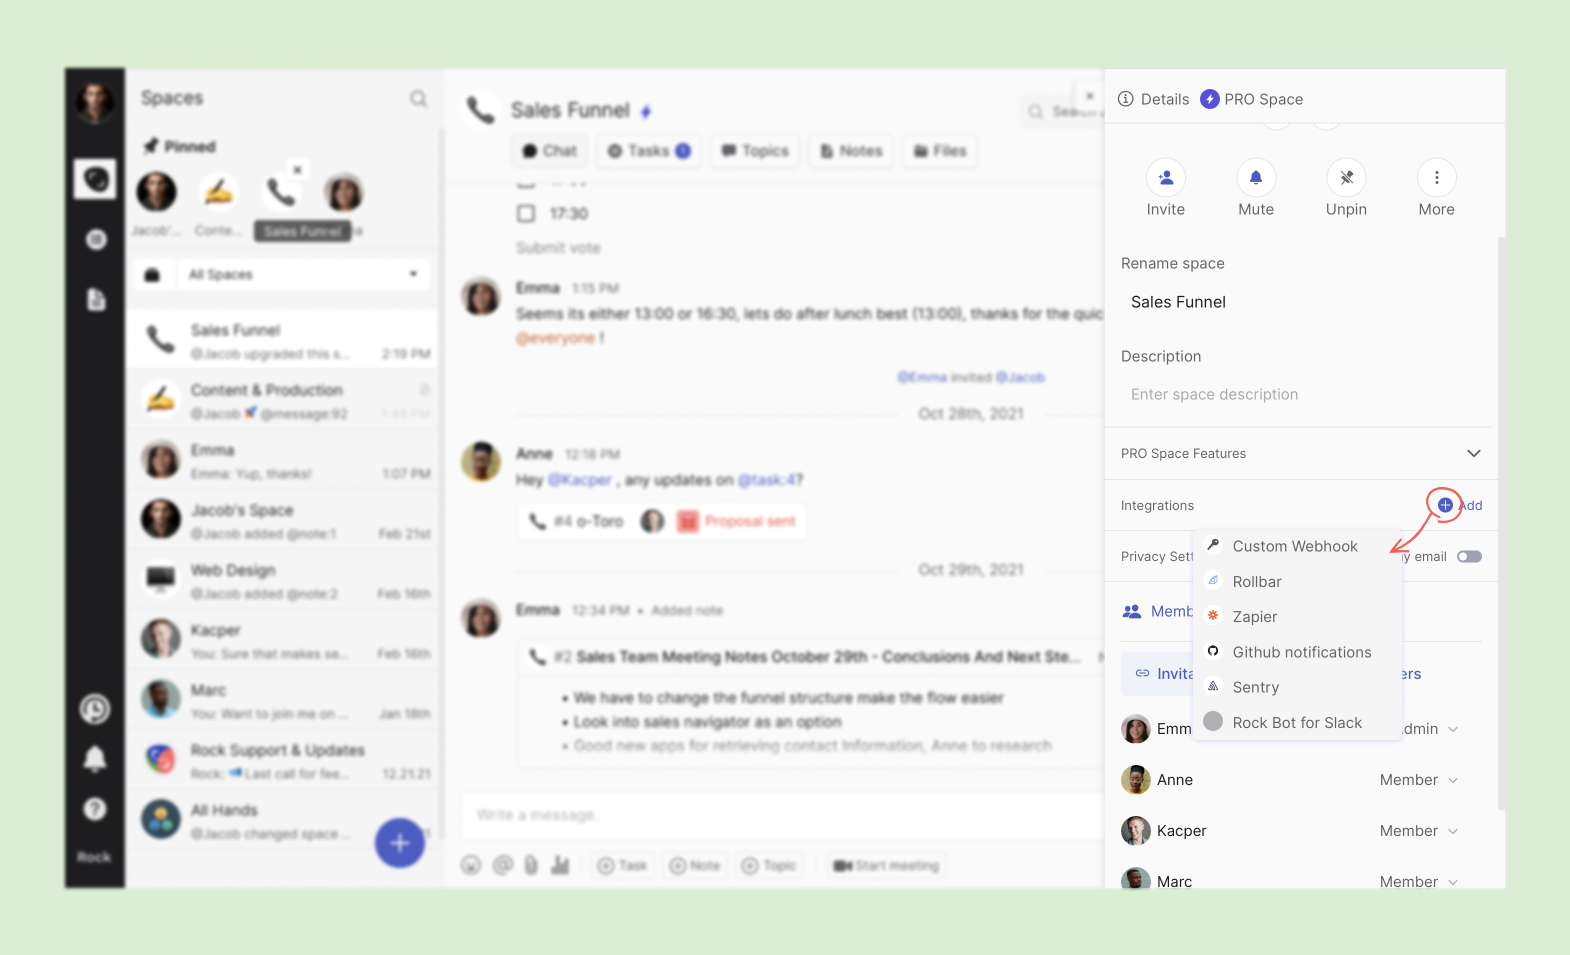
Integrations [PRO spaces only]
Integrations are only accessible if your space has been upgraded to PRO. They are also only visible to users with admin permissions in the PRO space. Check out our dedicated guide for Zapier integrations to learn more about bots and automations for Rock spaces.
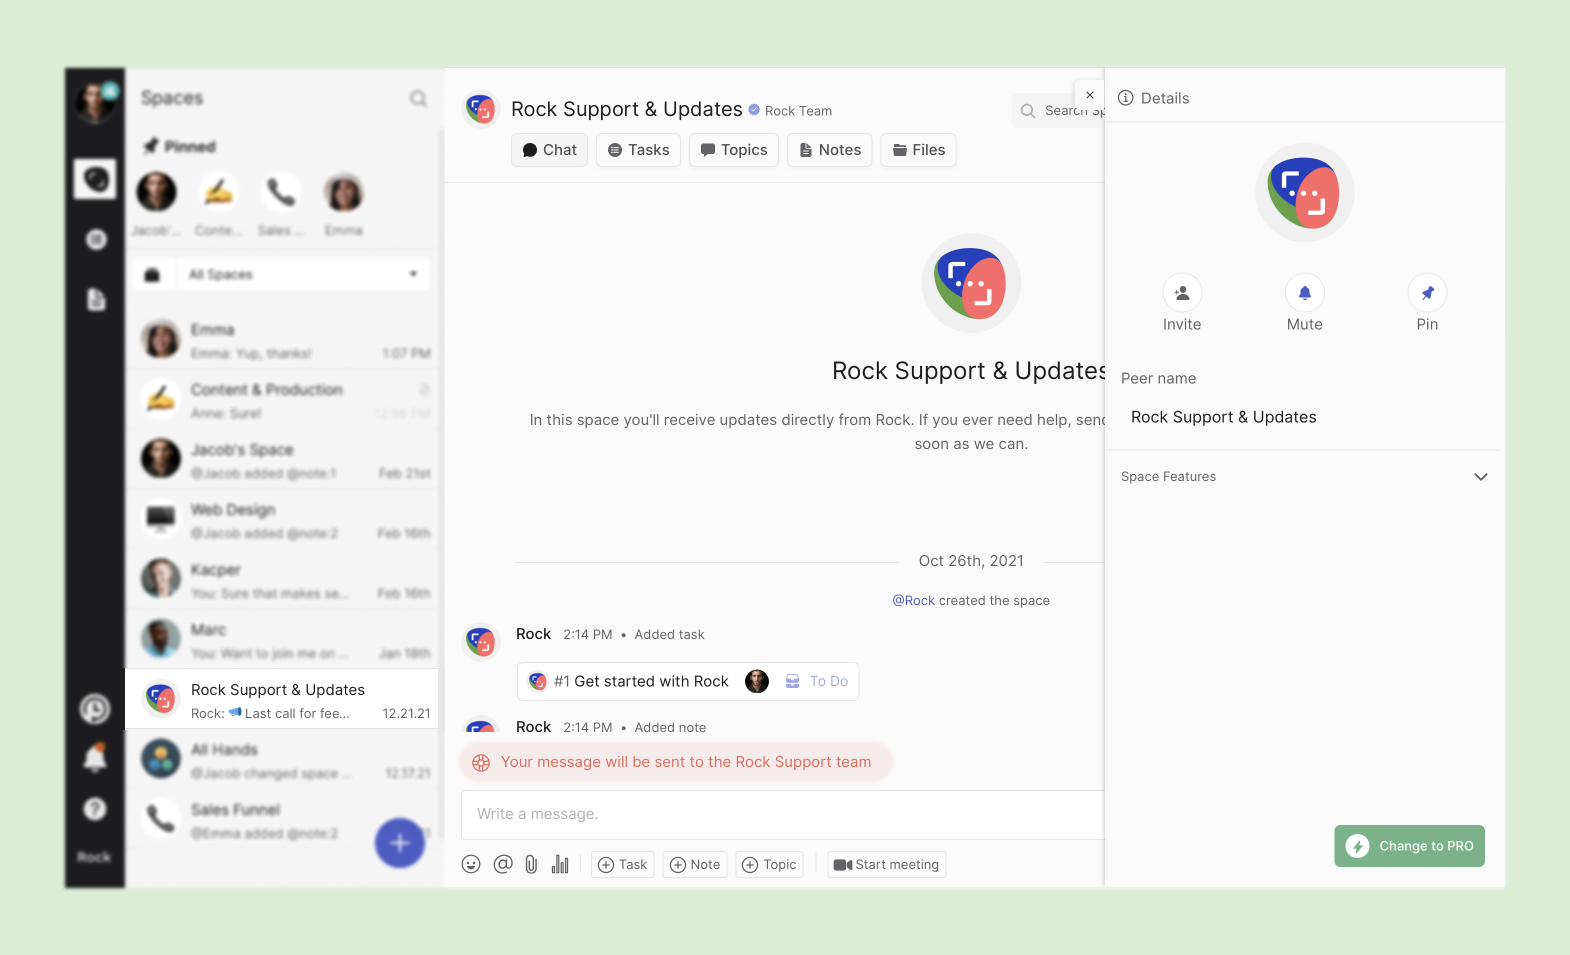
The ‘Rock Support & Updates’ space
The Rock team space is your personal contact point with the Rock support team. Any message you send in this space is directly sent to the team. You can use it to ask questions, share feedback or anything else you want to discuss with the team.
The Rock Support & Updates space cannot be deleted or archived. There are two personalized adjustments you can make to the space:
- You can mute the space if you don’t want to receive notifications from the space. Note that the messages are still sent through.
- You can pin the space if you want to keep the Rock Team close at all times for questions, feedback or anything else.
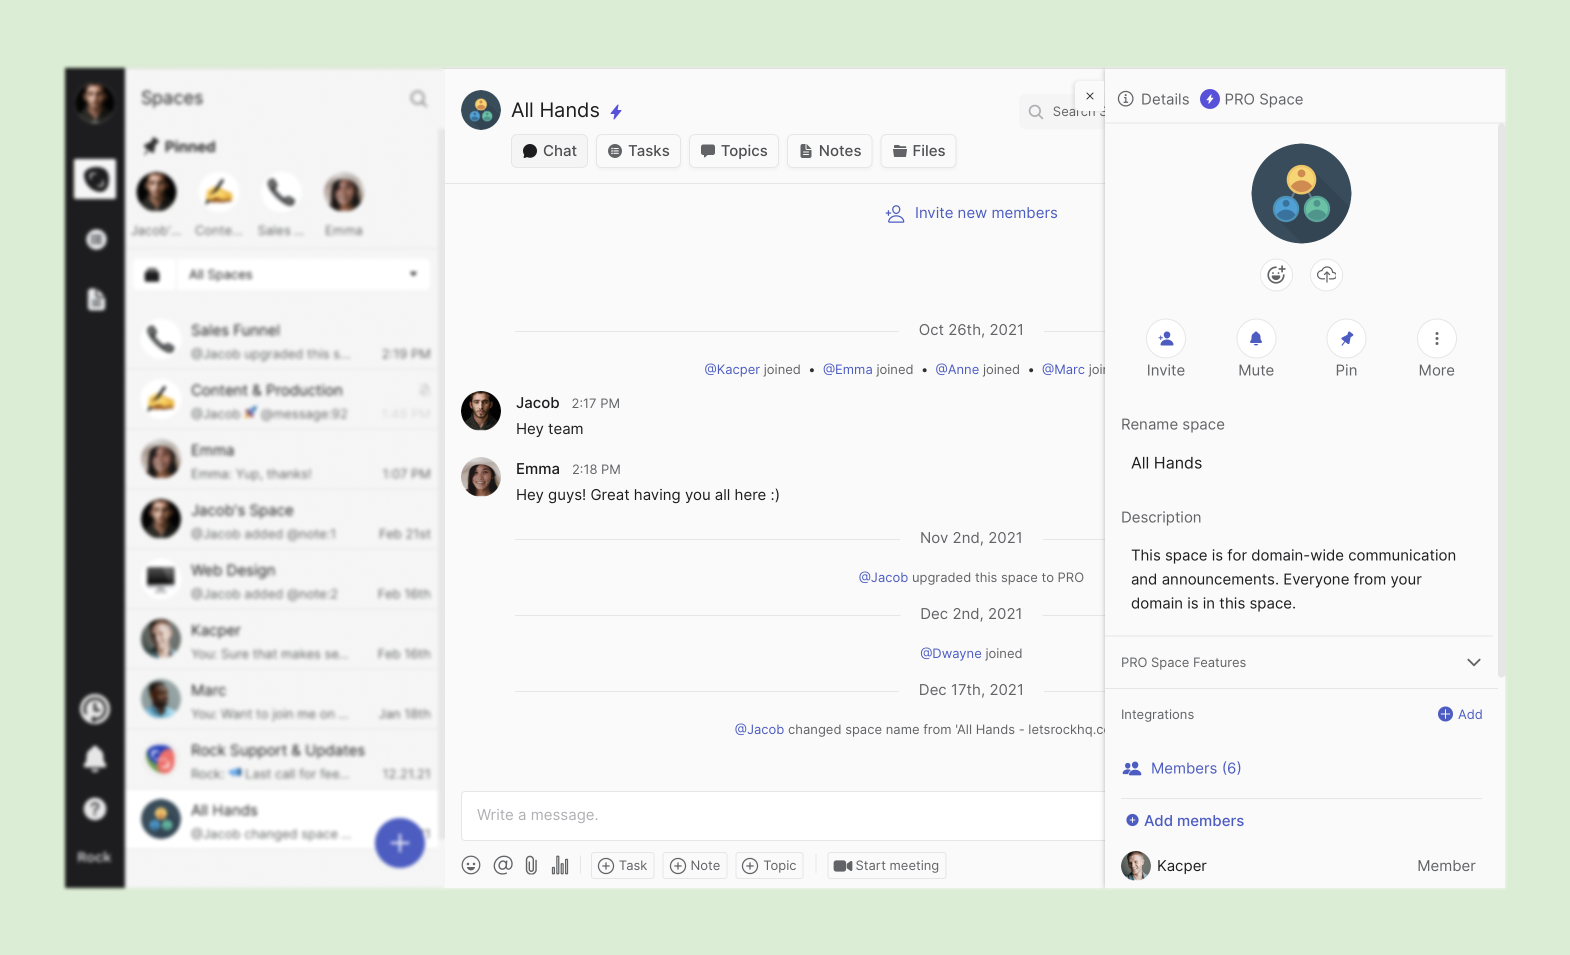
All Hands space
When you sign up with a unique domain we add all new signups from that domain to an “All Hands” space. This makes it easier to find team members on Rock, especially when starting out.The all hands space cannot be deleted. If you want to remove any users there are a few options:
- You can deactivate their account through your domain provider. The user will automatically be removed from the space once their account ceases to exist.
- Ask the user to manually delete their account from Rock. This can be done through the user settings panel.
- In the Unlimited plan a domain admin can remove other accounts from Rock manually.
- Accounts that have been inactive for a prolonged period will be automatically removed from the All Hands space.
The all hands space has the same space settings as a group space, the only difference being that there are no admins. Thus, most of the membership management capabilities are limited, although you can still add new users.
PRO Spaces
Users who upgrade their account to the Unlimited plan can create and upgrade an unlimited number of PRO spaces. Upgrading a space means that PRO functionalities will be enabled for all members within the space that have been upgraded, regardless of their membership plan. Both 1:1 and group spaces can be upgraded to PRO.Each PRO space includes:
- Custom fields in tasks
- Recurring tasks
- Sprints in the Tasks mini-app
- Share files up to 50MB in size (instead of 10MB)
- Webhooks and integrations with apps such as Zapier or Github
- Export tasks to CSV and Excel
- Unlimited free members in your PRO spaces
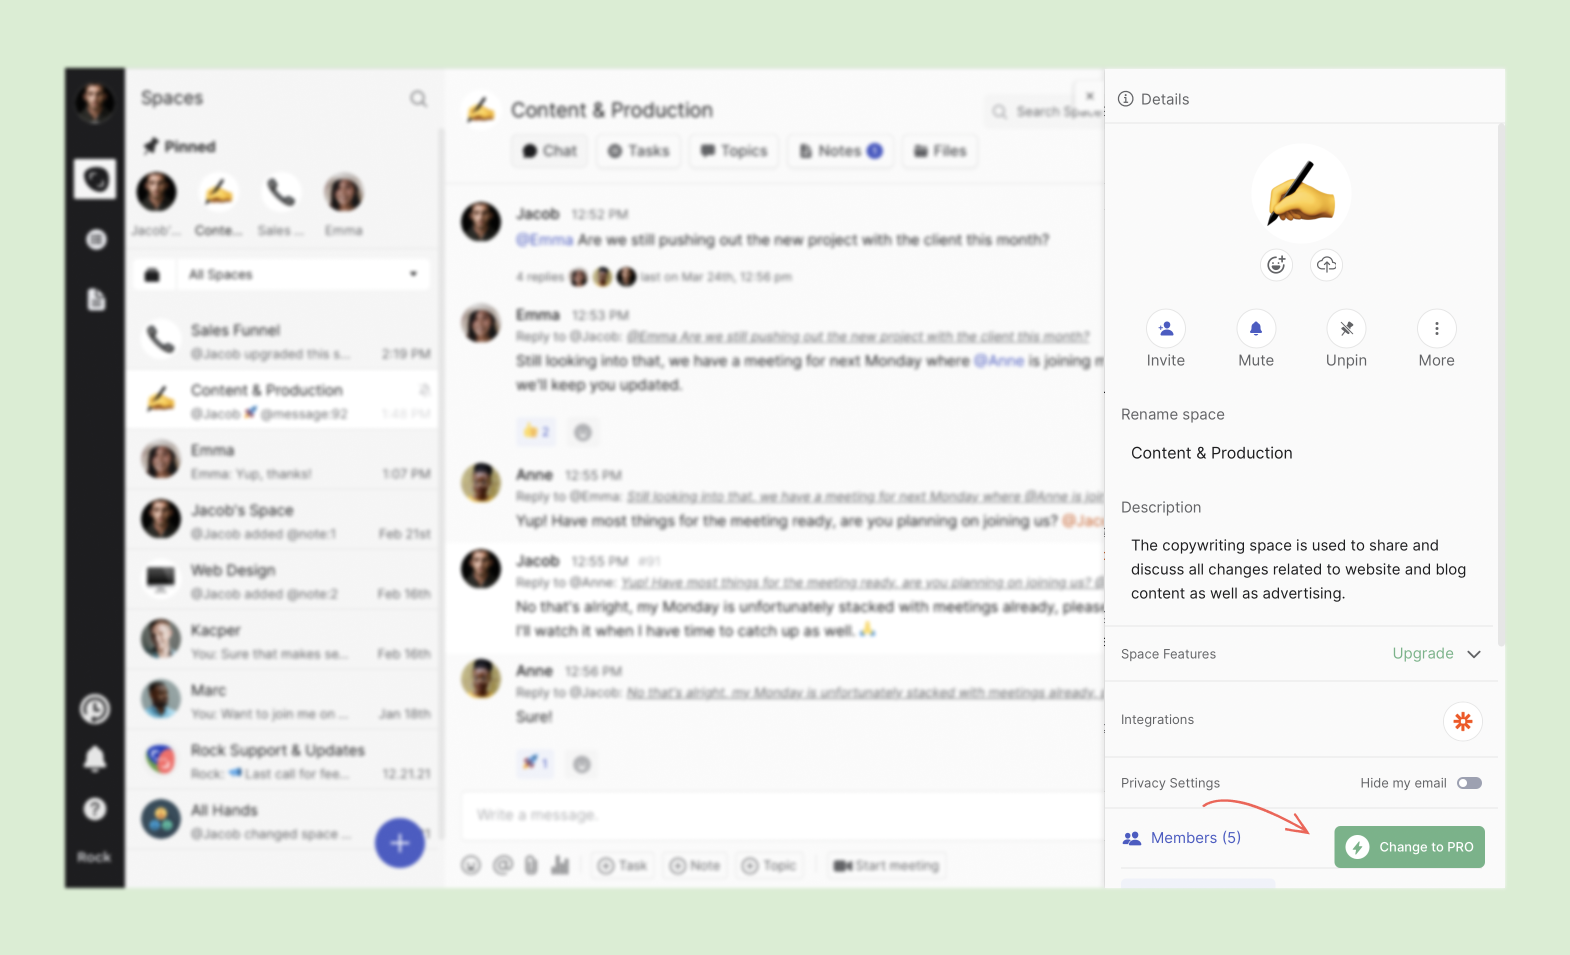
You can upgrade a space to PRO by going to space settings and pressing ‘Change to PRO’ in the bottom right corner.
Check out the dedicated guide for PRO spaces for more information about PRO spaces!
Questions and Answers
Why are there fewer space settings in non-group spaces?
Individual spaces, the Rock Support & Updates, and 1:1 spaces are created for individual interactions and don’t require any invites. They were created as a way for you to either document information or communicate 1:1 with someone in your team or the Rock team.
I want group space settings for my 1:1 space, how do I do that?
You can always create a group space and only invite one other person if you require any group settings that are not available for 1:1 spaces.
I’m looking to invite someone but it does not let me, why could that be?
You might not have the correct permissions to invite people to a space. You can always ask a member or admin for an invite link if it’s not possible to change your permissions within the space.
How do I rejoin a 1:1 space on Rock?
If you leave a 1:1 space, you will not be re-added unless you join the space yourself. You can do this by searching for the contact of the other person whose 1:1 space you left. Then, the space should reopen. This is only possible on mobile currently.
I’m trying to duplicate a space but it does not allow me to do so?
You can only duplicate group spaces. Note that you need to be the purchaser of the Unlimited plan to duplicate a space, as it’s account based and not PRO space based. This also means that FREE group spaces can be duplicated by a paid account purchaser.
Can anyone adjust space settings in a group space?
No, space settings are dependent on user roles.
- A guest will only be able to change fields that connect to their own experience: muting, pinning and hiding their email if they wish to do so or archive the space if they have no need for it anymore.
- Members can change the space name and image, and invite other members. They cannot remove users or add bots in integrations for PRO spaces.
- Admins can toggle all described fields in the article.
How do I downgrade a PRO space?
You can downgrade a PRO space in your user settings. Go to settings -> your paid plan -> PRO spaces -> press the small x to revoke PRO functionality from the space.


